It’s three stories straight down.
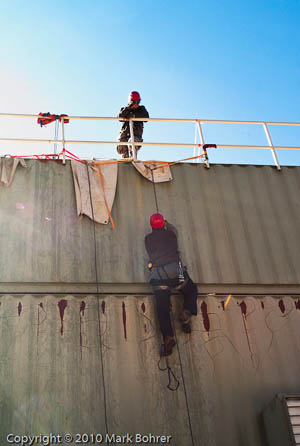
Yes, you’re tied in to the belayer’s rope, and you’re attached to a separate rappel rope with a brake rack or Figure Eight. Yes, you have great control with the brake rack’s friction on the rope.
But instinct screams at you to back off from the edge. That first time over the railing is the hardest.
Climbers, those folks who go up the faces of Yosemite’s El Capitan or Half Dome using their legs and hands, are usually a very safe group. Lead climbers will be roped and belayed from below by a follower. Every 5-10 feet or so, climbers hammer a new bolt into the rock and clip the rope to it, shortening the distance if they fall. Climbing ropes are dynamic – they stretch anywhere from 10-30% when they’re stressed by a falling climber, decreasing the shock. And belayers use simple lock-off devices to stop the rope in a leader’s fall.
Most of us shy away from the human fly routine. But what no one tells you is how much fun it is to defy gravity.
I’d done a little climbing at an indoor climbing gym, but that’s not the same as outdoor climbing. As part of an intermediate backcountry skills course offered by West Valley College, I was lowered near the base of the sandstone cliff face by the Falls at Castle Rock State Park. I didn’t know I was climbing a route rated 5.8, when the toughest one I’d done indoors was 5.7.
The hardest part was the scramble up the seemingly featureless rock face at the bottom, followed by sweat dripping down into my eyes. With some rope tension from above and using very small footholds, I pushed myself high enough to step into the next set of small edges.
Successful climbing requires you to see and plan your next set of foot-and hand-holds as you use your legs to push yourself up. You quickly discover your arms’ lack of strength to haul you up the rock. Handholds are best used for balance.
I conquered my fear of heights with no apparent means of support during the next three days, at the California Department of Forestry’s training center near Ben Lomond. After you go over the railing for the first rappel and head on down, tying off the rope to stop yourself about halfway to the ground, the next time is easy and starts to be fun.
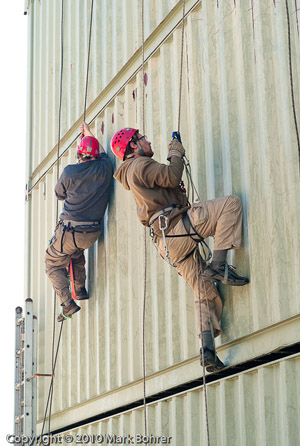
Ascending the rope from the ground using Prusik-knotted slings for each leg and your harness is a little harder. The trick is finding your rhythm – sit back in your harness, push up both leg slings, then step up and push up your harness sling, lean back and repeat. There’s a rush of accomplishment when you reach the top, thread your brake rack through the rope, and rappel back down.
Put this together with patient packaging and transport on titanium litters, and you have useful emergency skills. My class practiced lowering and raising patients on tree-studded hills, with a haul team pulling and litter team keeping the patient level. The litter wheel clamped underneath is the only way to make a five- or ten-mile transport down a trail without sore muscles.
When students asked instructor and rescue expert Kim Aufhauser about high-angle rescue and litter transport on rock faces, his answer was, “We cover that in 12C,” the next backcountry skills course in West Valley’s Park Management program.
So I’ll have to take that class for more hands-on experience.
Shot Notes –
For shooting confined to one area outdoors, you can meter and expose manually, since the light won’t change that fast. If you have a small point-and-shoot digital or film camera, use it. When you’re in a remote location and you can get almost as close as you want, lightweight, small equipment works best.
I used the smallest, lightest equipment I have – a Leica M8 with 35mm, 50mm and 90mm lenses.
I was shooting in the shadow of a building, or under heavy overcast, so extreme contrast wasn’t a big problem. There were only a few times when I had to choose correct exposure of a face and blow out some of the background. This is almost always the right choice – your viewers want to see your subject’s eyes and expression.
I’m extremely impressed with your writing skills and also with the layout on your blog. Is this a paid theme or did you modify it yourself? Anyway keep up the excellent quality writing, it’s rare to see a great blog like this one nowadays..
Lots of up-front work to set up the site. Once that was done, things got easier – I just blog about photography I’m doing, when I have time. Thanks for visiting and commenting.
With havin so much written content do you ever run into any issues of plagorism or copyright infringement? My blog has a lot of completely unique content I’ve either created myself or outsourced but it seems a lot of it is popping it up all over the internet without my agreement. Do you know any methods to help protect against content from being ripped off? I’d really appreciate it.
I use my own watermarked and copyrighted photographs with my text, and haven’t observed any plagiarism so far. I write about atypical, non-mainstream topics too, and that probably minimizes problems.
Hi does anyone know if your site has a RSS Feed or any kind of a E-Mail list that I could sign up to,
Cheers.