You just finished shooting an absolutely killer sunset, waiting 10 minutes after the sun disappeared for the best color. So it’s time to head inside, put the cameras away and pop a cold one, right? After the sunset, El Prado, New Mexico Nope. Now a different kind of fun begins. ADVERTISEMENT Want to explore Southwestern ruins and petroglyphs, without worries about finding the best spots? Check out a guided photo tour with me!  Hidden Mesa Prieta Tour Starry Night After a truly memorable Taos sunset, I stayed outside for the starry lightshow. We’d chosen Taos Monte Bello RV Park for its position away from city lights. So there was less light pollution reflecting into the sky and washing it out. Beyond location choice, setting up for stars meant a few changes. First, I took the camera out of aperture priority – where I choose the lens aperture and the camera chooses shutter speed – and set it for manual exposure. With a tripod, I had the option of very long exposure times. But I wanted sharp starry pinpoints, not arcing blurs from the earth’s motion. So I used the 400 rule – max exposure time without blur = 400/focal length. This rough rule of thumb gave me 16 seconds with a 24mm lens. Turns out ISO 1600 was high enough for 12 second exposures of a very dark-sky at around f/1.8. So that’s what I used for focus near infinity. With almost everything distant, I had plenty of depth of field. Where’s the Cool Stuff on the Ground? It was a cloudy night, but there were clear breaks to stars. As I looked around for interesting foreground stuff and horizon features in the approaching darkness, I saw a few possibilities. First, I had lights from cars and houses along highways lighting up the foothills. Second, a pre-fab warehouse was well-lit by its security lighting. 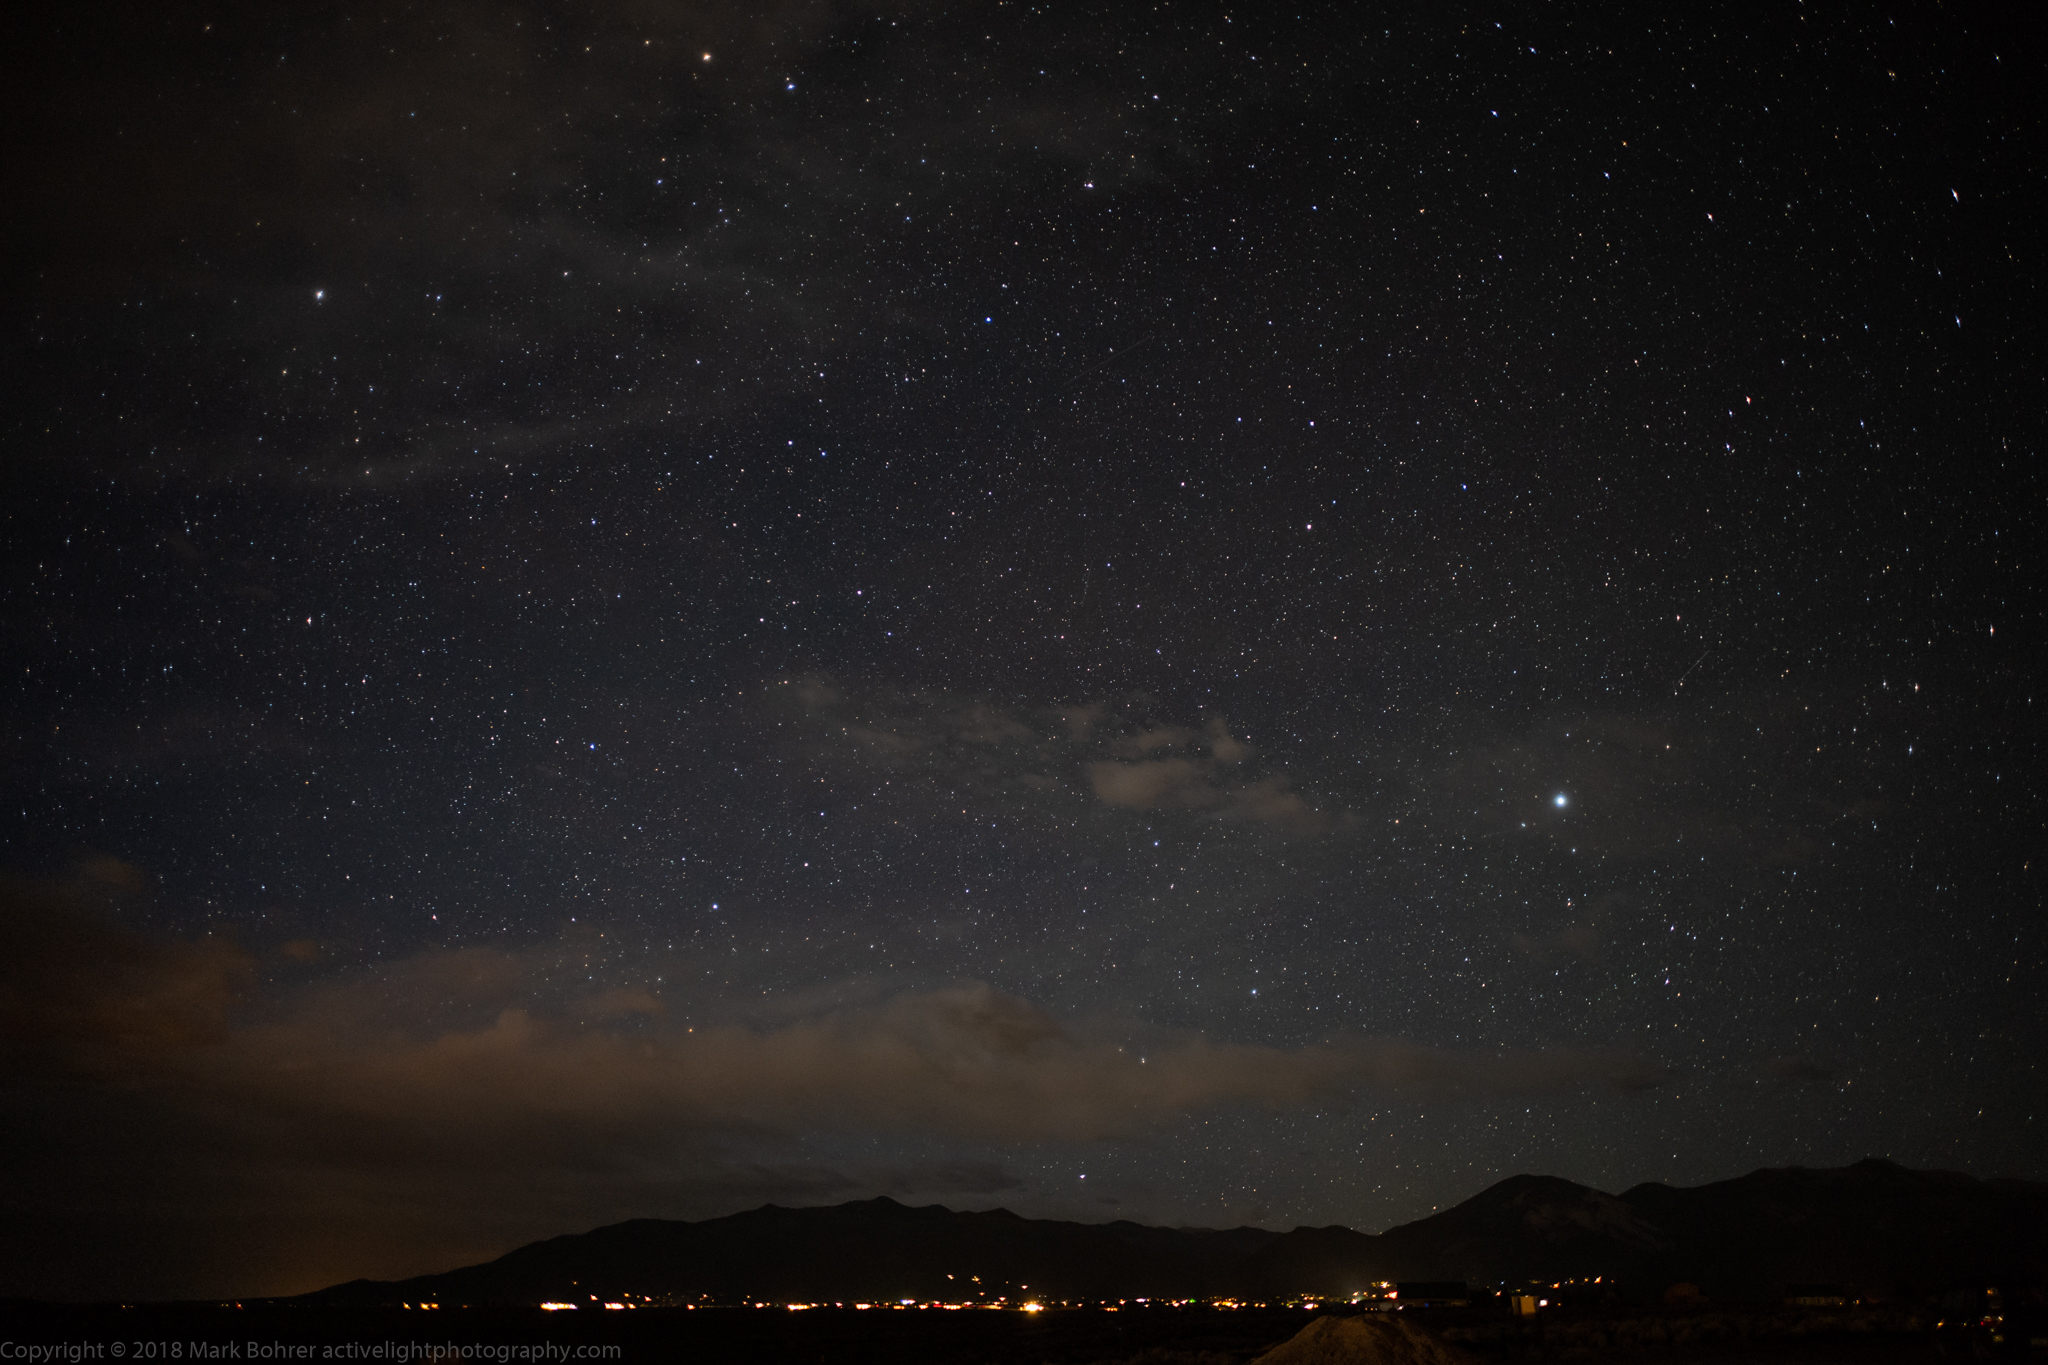 Eastern Mountains, Taos Valley, New Mexico I had relatively clear skies above the eastern mountains where the house lights were, so I set up for a horizontal landscape and took it. I expected coma, bright pinpoint stars looking like batwings at large apertures, and I got it on the edges. Stopping down to a smaller aperture can eliminate this, but I had that 16 second maximum. I could also use a higher ISO to get around that, but then I’d start wondering which points were stars and which were noise speckles. 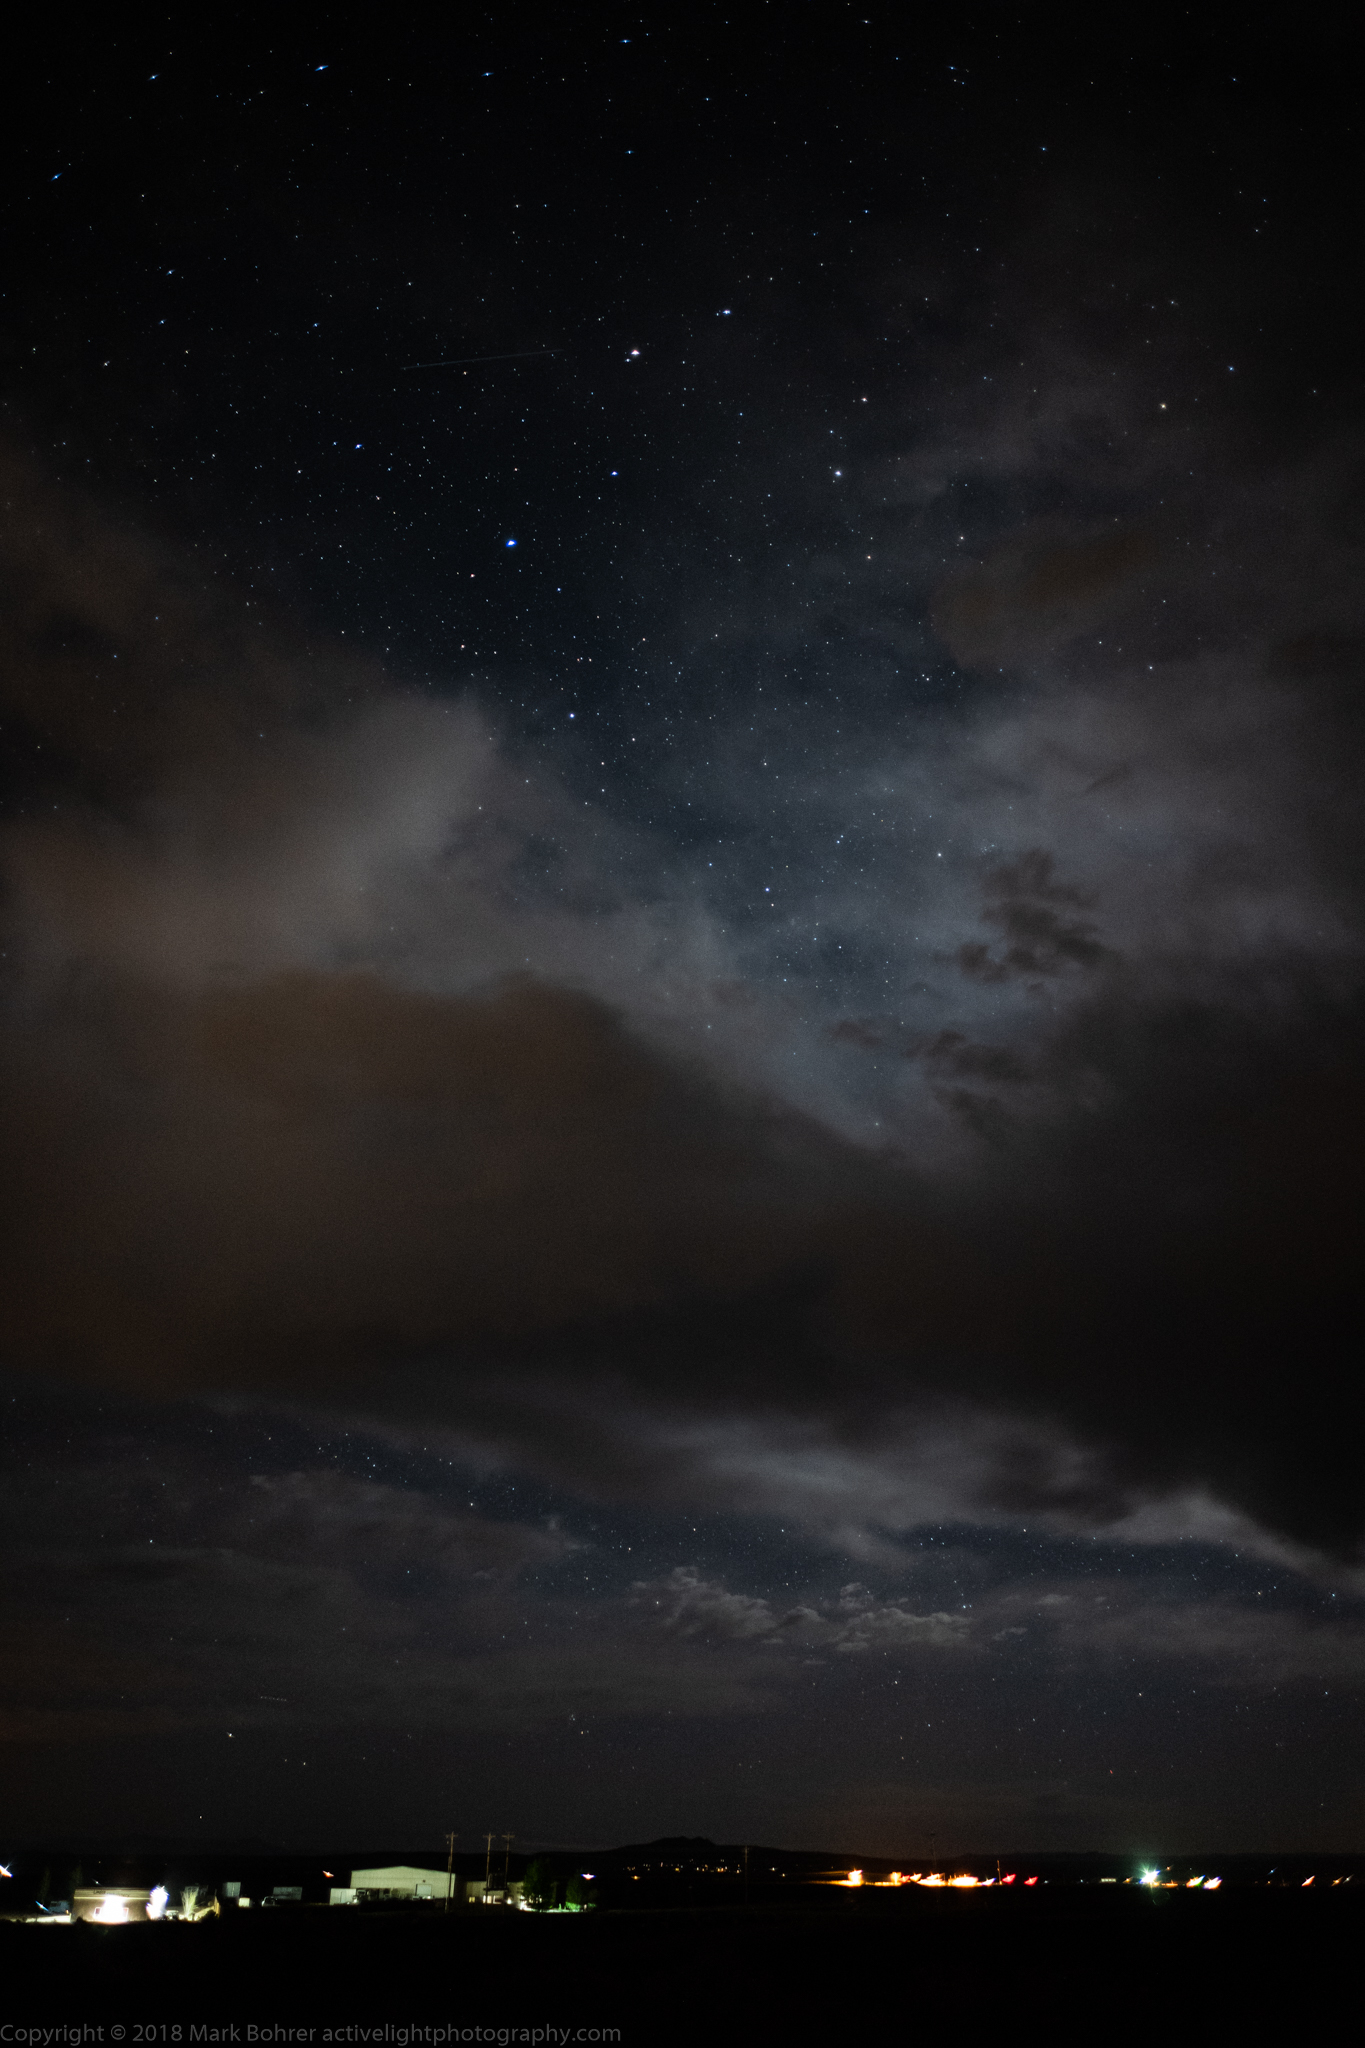 Clouds, sky and warehouse, El Prado Find Those Stars Above the Clouds Then I aimed south for that foreground warehouse. There were more clouds here, and the occasional white-hot headlights passing by. I chose a vertical composition for more stars above the clouds, waited for a break in traffic to eliminate headlights, and shot it. The moon was behind the clouds for some great backlit glow, and fewer washed-out stars  Late evening picnic, El Prado Paint it Red I had almost tripped over some sage and a picnic table while I was blundering around in the darkness. So I decided to use them in a shot. I’d forgotten my flashlight, but I did have my headlamp. So I set up for some light painting. First I looked at the lens’ depth of field scale and chose an aperture that would keep the sage, picnic table and starry sky in focus. That turned out to be f/4.5. Gotta love that big depth of field with a 24mm lens! After some trial and error with painted light, I chose a 15 second exposure, at the hairy edge of the motion / no motion breakpoint. That was also enough time for me to walk around aiming my headlamp at things I wanted to highlight. I chose red because it was either that or white with my headlamp. Red also looked good in the scene. Light painting isn’t an exact science. I knew I had to get out from behind the camera to do it – just like moving flash off-camera, you want to get interesting shadows that don’t fall directly behind your subject. I also knew there was nothing to trip over to the left of the sage and table, so that was where I went. It took me a few tries to get something I liked. Another advantage at f/4.5 with the 24mm f/1.4 Summilux-M ASPH is that coma batwings are gone. Stars render as pinpoints. Depending on the lens, your mileage may differ. It wasn’t cold after sunset, unlike my Colorado starfield shooting last February. But it felt like I was done, so I joined my wife and dogs inside. 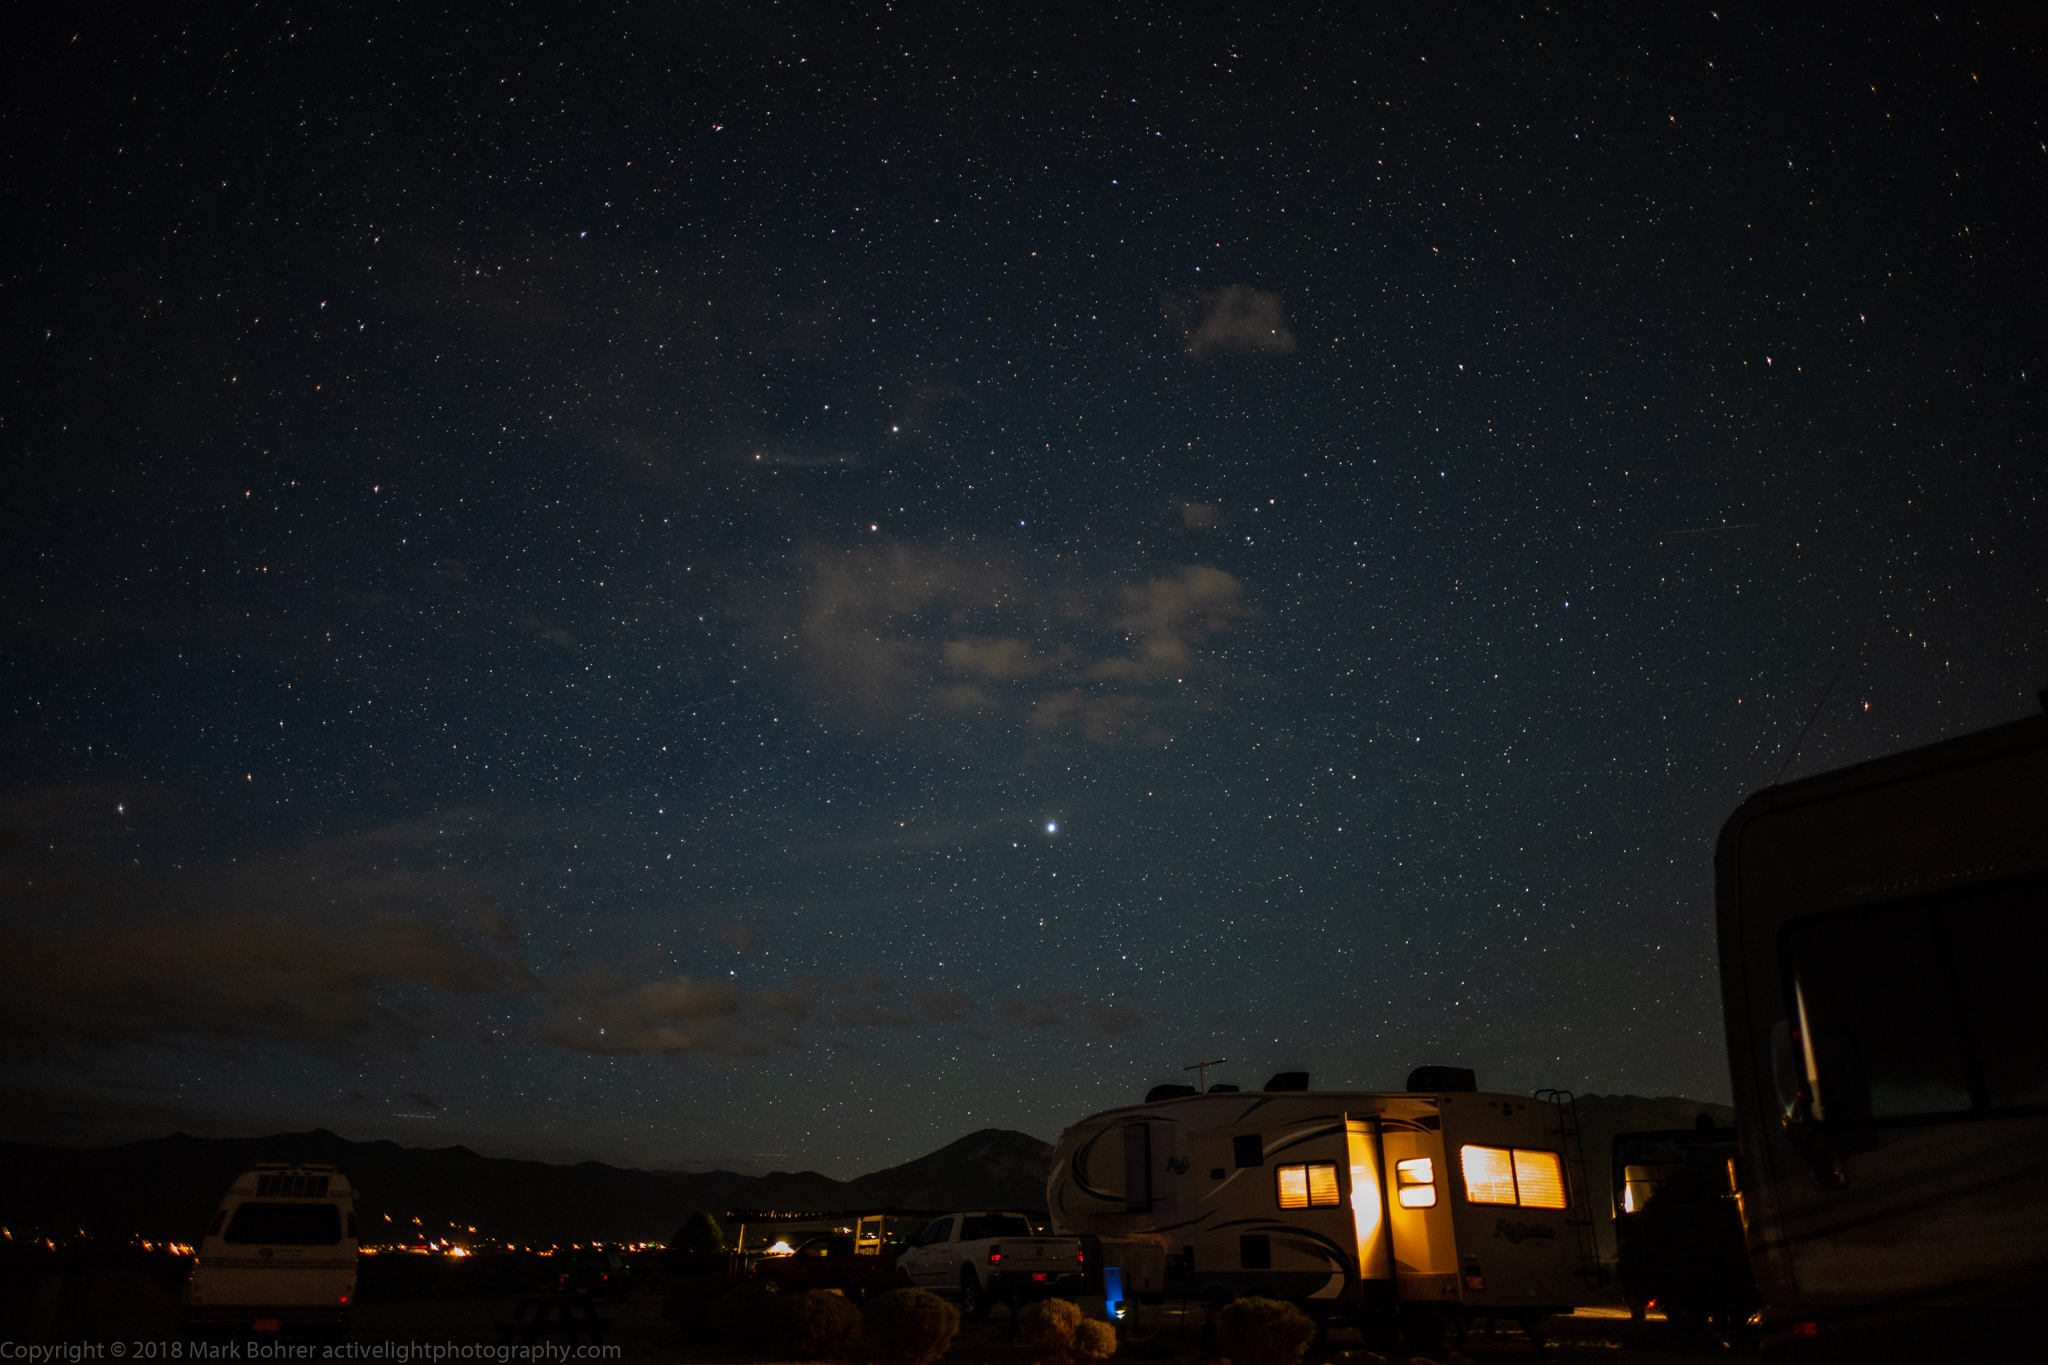 Night sky with RV park, El Prado Shot Notes Many of today’s lenses lack detailed depth of field scales. You can stop down and see the effect with a mirrorless or dSLR camera, but this can give you a noisy or dark view at night where it’s hard to see what’s sharp. The best way to check sharpness is using live view, and aiming your light at the closest foreground stuff you need to appear sharp. Even stopped down to f/4.5 or f/5.6 at ISO 6400, you’ll be able to see sharp focus on that flashlit detail. This will be the near end of your depth of field. The far end is infinity. Looking at the camera’s LCD screen, you can now adjust focus until you see sharp pinpoint stars and still keep focus on your lit foreground. Your camera’s magnified view will help you check this. Again, it isn’t an exact science – you may need to try a few different focus settings to get what you want. 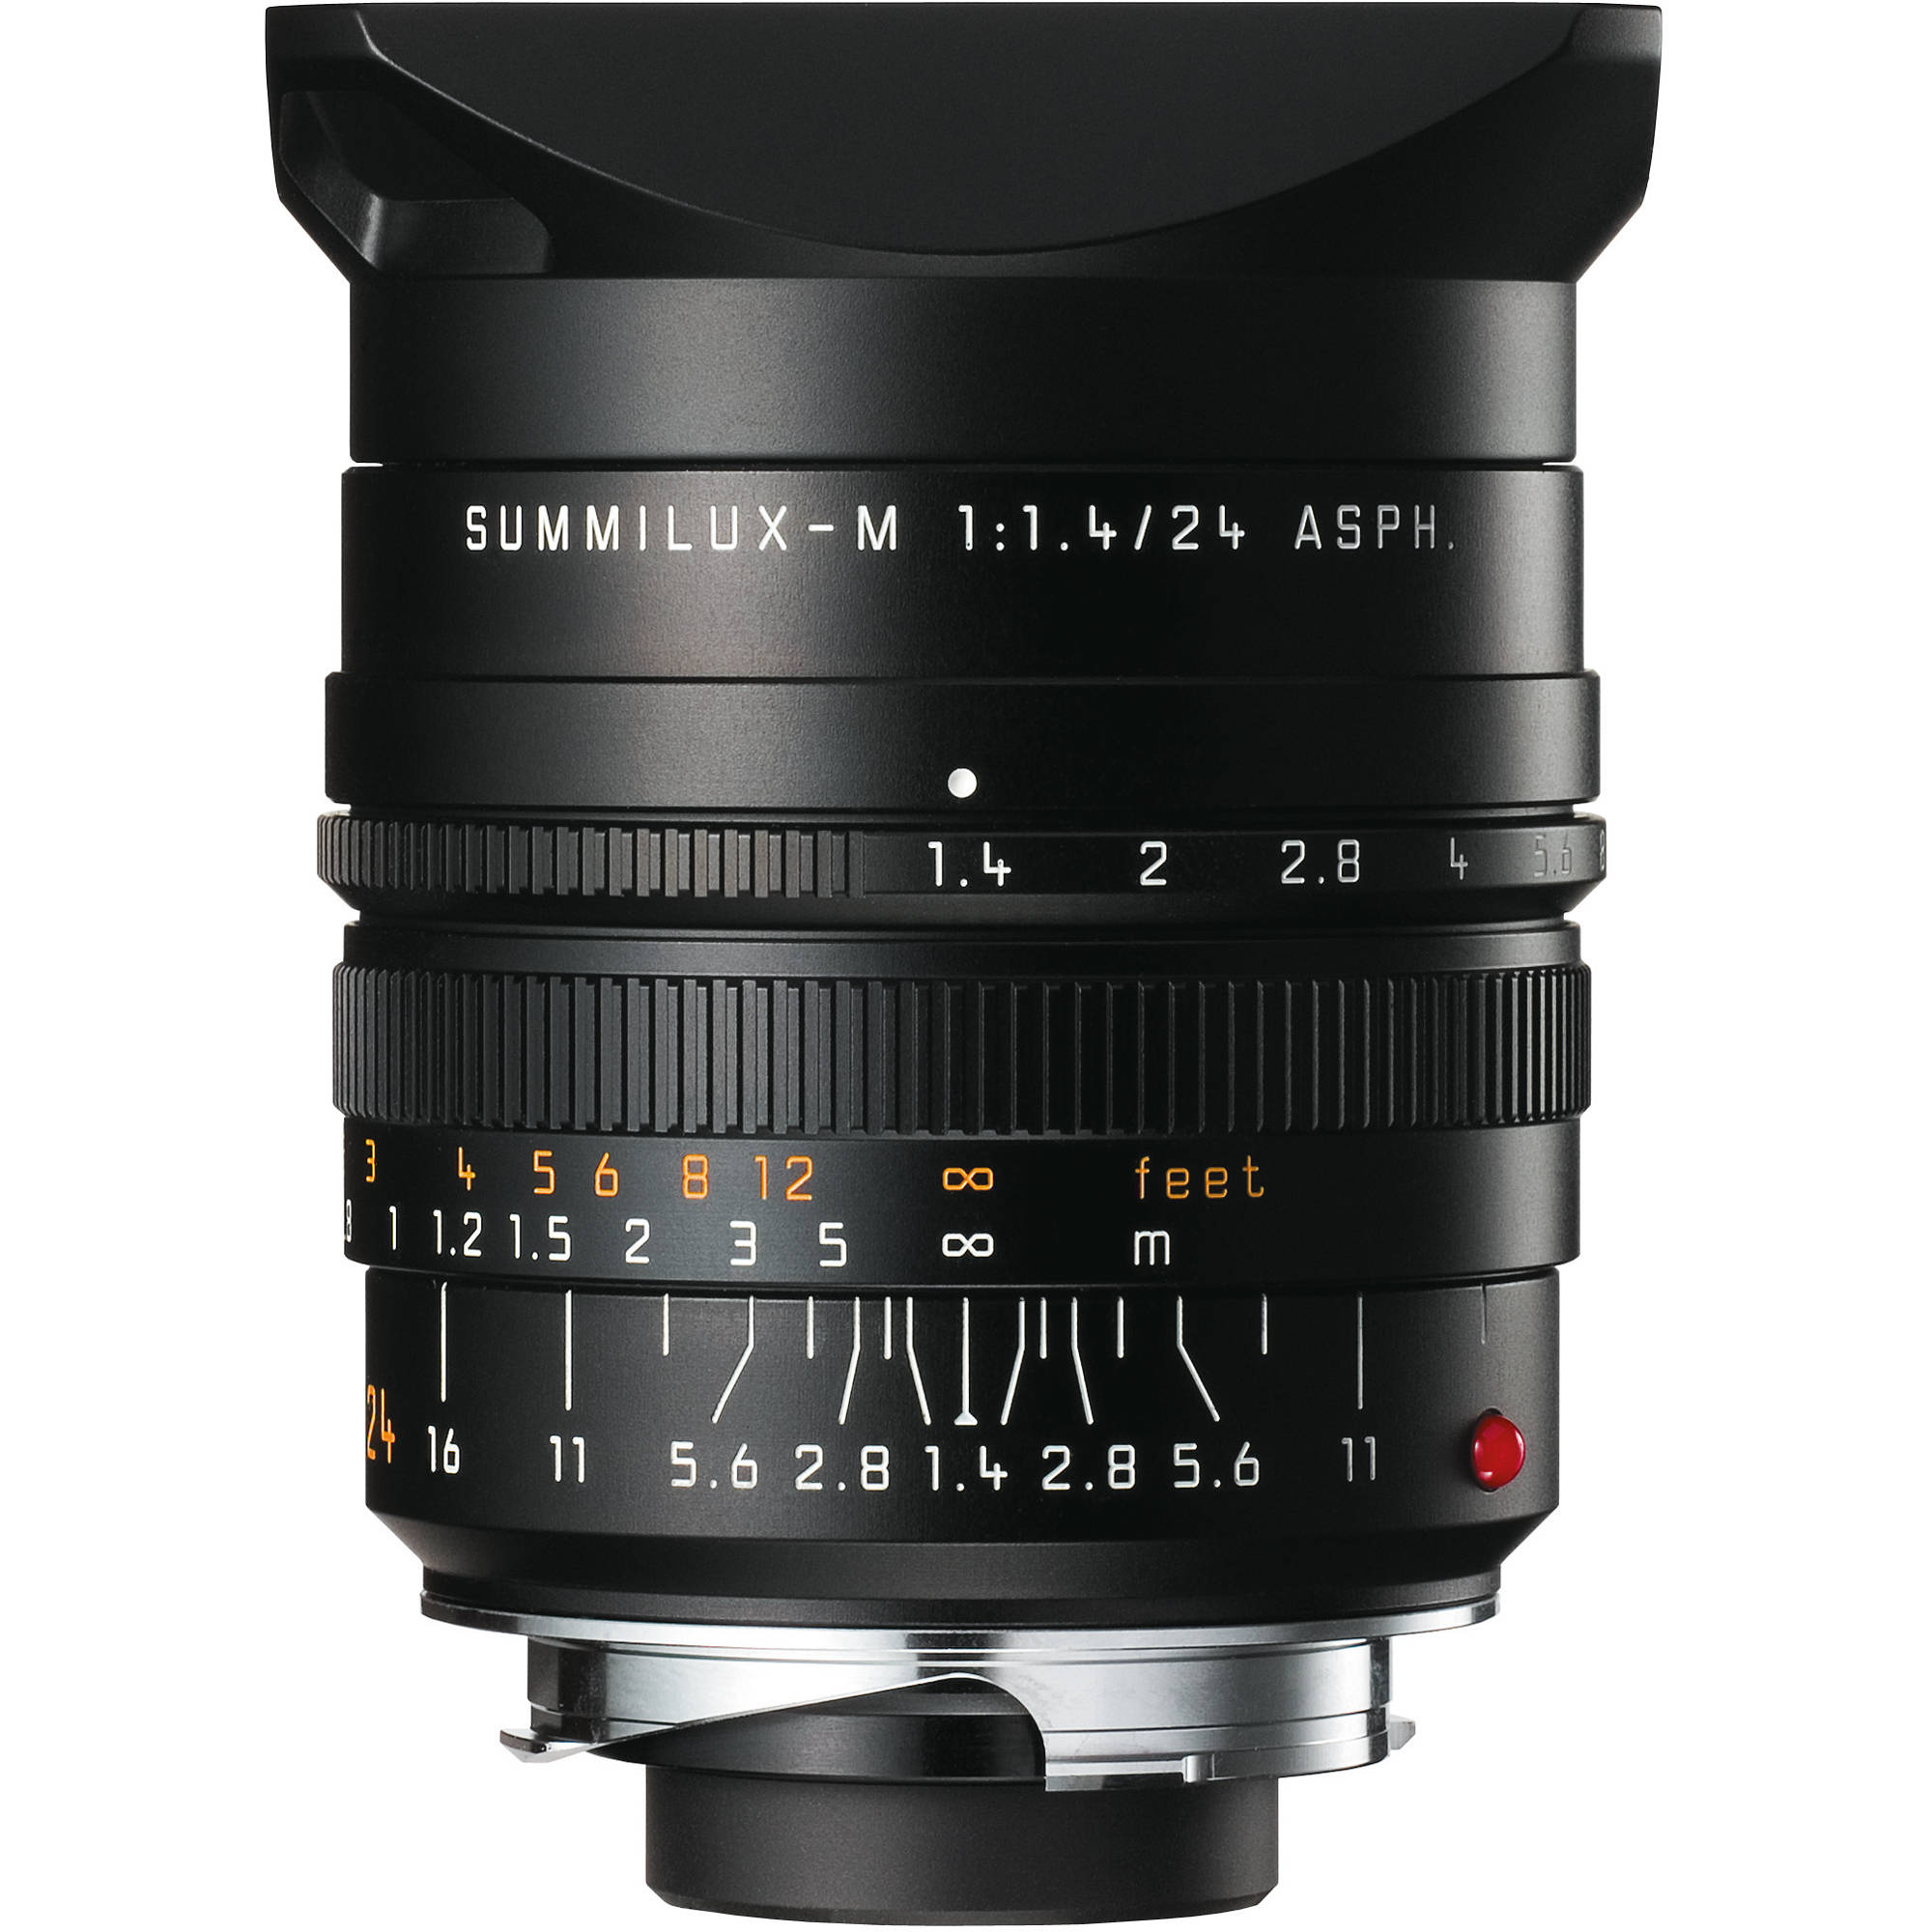 Depth of field scale – 24mm f/1.4 Summilux-M ASPH Choose Your Weapons I used a manual-focus 24mm f/1.4 Summilux-M ASPH rangefinder lens with a very complete depth of field scale – it shows every aperture. This made shooting much easier, with a clear guide to what would be sharp. The focusing ring is also nicely weighted to stay put. 24mm gives a wide-enough view of the night sky, there are a lot of reasonably-priced good ones with f/1.4 apertures, and the front element on a wide-aperture 24mm is still big enough to gather a lot of light at night. Auto focus lenses can have very light manual focus action, making it easy to accidentally move the ring away from the position you want. And autofocus doesn’t help at night, even when there’s enough light for it to work. Invariably the camera chooses a focusing point you don’t want, then changes focus when a bright light enters the scene or you move your flashlight beam. You want focus to stay where you put it. I usually set my focus for the required depth of field (DOF) at a stop larger than the aperture I’m using. That guarantees the sharpness I need. This time, I set it for just a half-stop larger than the actual stop I used, since exposure time would have otherwise been too long. This DOF turned out to be enough for good sharpness. I use Light Pollution Map (iOS and Android) to find the least light-polluted locations ahead of time. It’s been updated relatively recently, unlike some other similar apps. There are also online dark sky finders, but I prefer a local copy on my iPad. More Information Keimig, Lance (2015) Night Photography and Light Painting: Finding Your Way in the Dark. (2nd Edition). New York, NY: Focal Press. Dunbar Technology, LLC dba Photographer’s Arsenal (February 2017). Light Pollution Map – Dark Sky (Version 4.2.0) [Mobile application software]. Retrieved from https://itunes.apple.com/us/app/light-pollution-map-dark-sky-finder/id1200379779 |
(408) 483-3782
Curious about how to shoot ruins?(408) 483-3782
Recent Comments