|
Plan But Verify When I plan a shoot, I need to know a few things – when and where are sunrise and sunset, and where will I need to be for best light on my subject? And what direction do prominent landscape features or ruin fronts face? 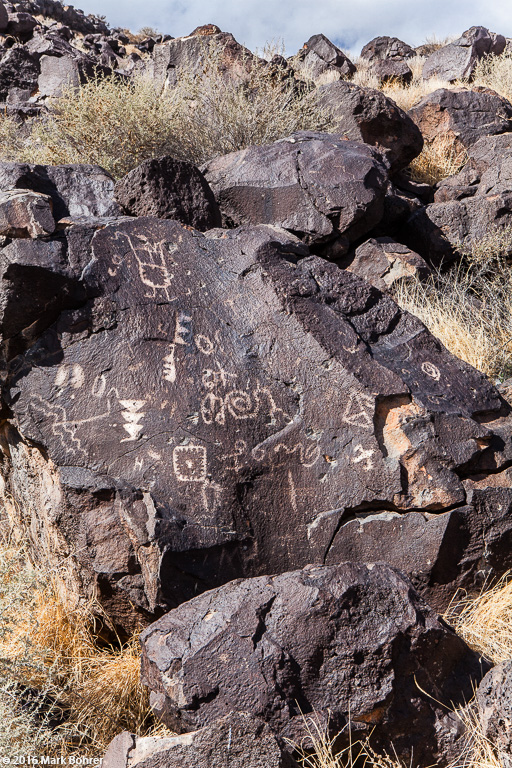 Below Mesa Prieta, Petroglyph National Monument Albuquerque’s Petroglyph National Monument encloses a 17 mile volcanic escarpment – a face of crumbled rock – running along a roughly north-south line, with some long squiggles east and west. Petroglyphs appear in many places on the crumbled rocks. Predicting shadow direction before I get there lets me pre-visualize pictures, and pick the best picture times. Knowing that most petroglyphs face south or southwest narrows it down even further. The Old Standby I predict shadows, light paths and even light color temperature with a couple different apps. A friend told me about The Photographer’s Ephemeris many years ago. Type in your location, and TPE will show you the shadow direction, plus sun and moon altitude-azimuth angles for any calendar day and time. Slide your finger along the bottom of the screen, and you’ll see sun and moon shadows as they shorten towards noon and lengthen again towards sunset. Of course, the only time moon shadows appear is when the sun isn’t in the sky.  The Photographer’s Ephemeris map view – Mesa Prieta, Petroglyph National Monument But keep your finger on the screen. The shadows disappear as soon as you pick up your hand. You’ll still see the sunlight and moonlight directions for the time you stopped at, plus light lines at sun and moon rises and sets, and alt-azimuth locations for sun and moon. You can set your local elevation so you get the exact timing for local sunrise above mountains or other natural features. And you can set primary and secondary object heights – useful for figuring out when the moon will peep out from behind a building or rock spire from your location. You can also set elevation offset if you know the local elevation is off in the app. Create a free TPE account, and you can sync saved locations across multiple devices and the desktop web app. A Second Choice Sun Surveyor was released around 2013. It also shows sun shadows and sun and moon paths across a relief map at any location you choose. it also overlays an arc of the moon’s and sun’s travel with time / position indications, which definitely helps me visualize light direction and terrain-based local shadows for the whole day. This app also does the finger-slide time-of-day animation trick, and its shadow lines are always visible, whether your finger’s on the screen or not. 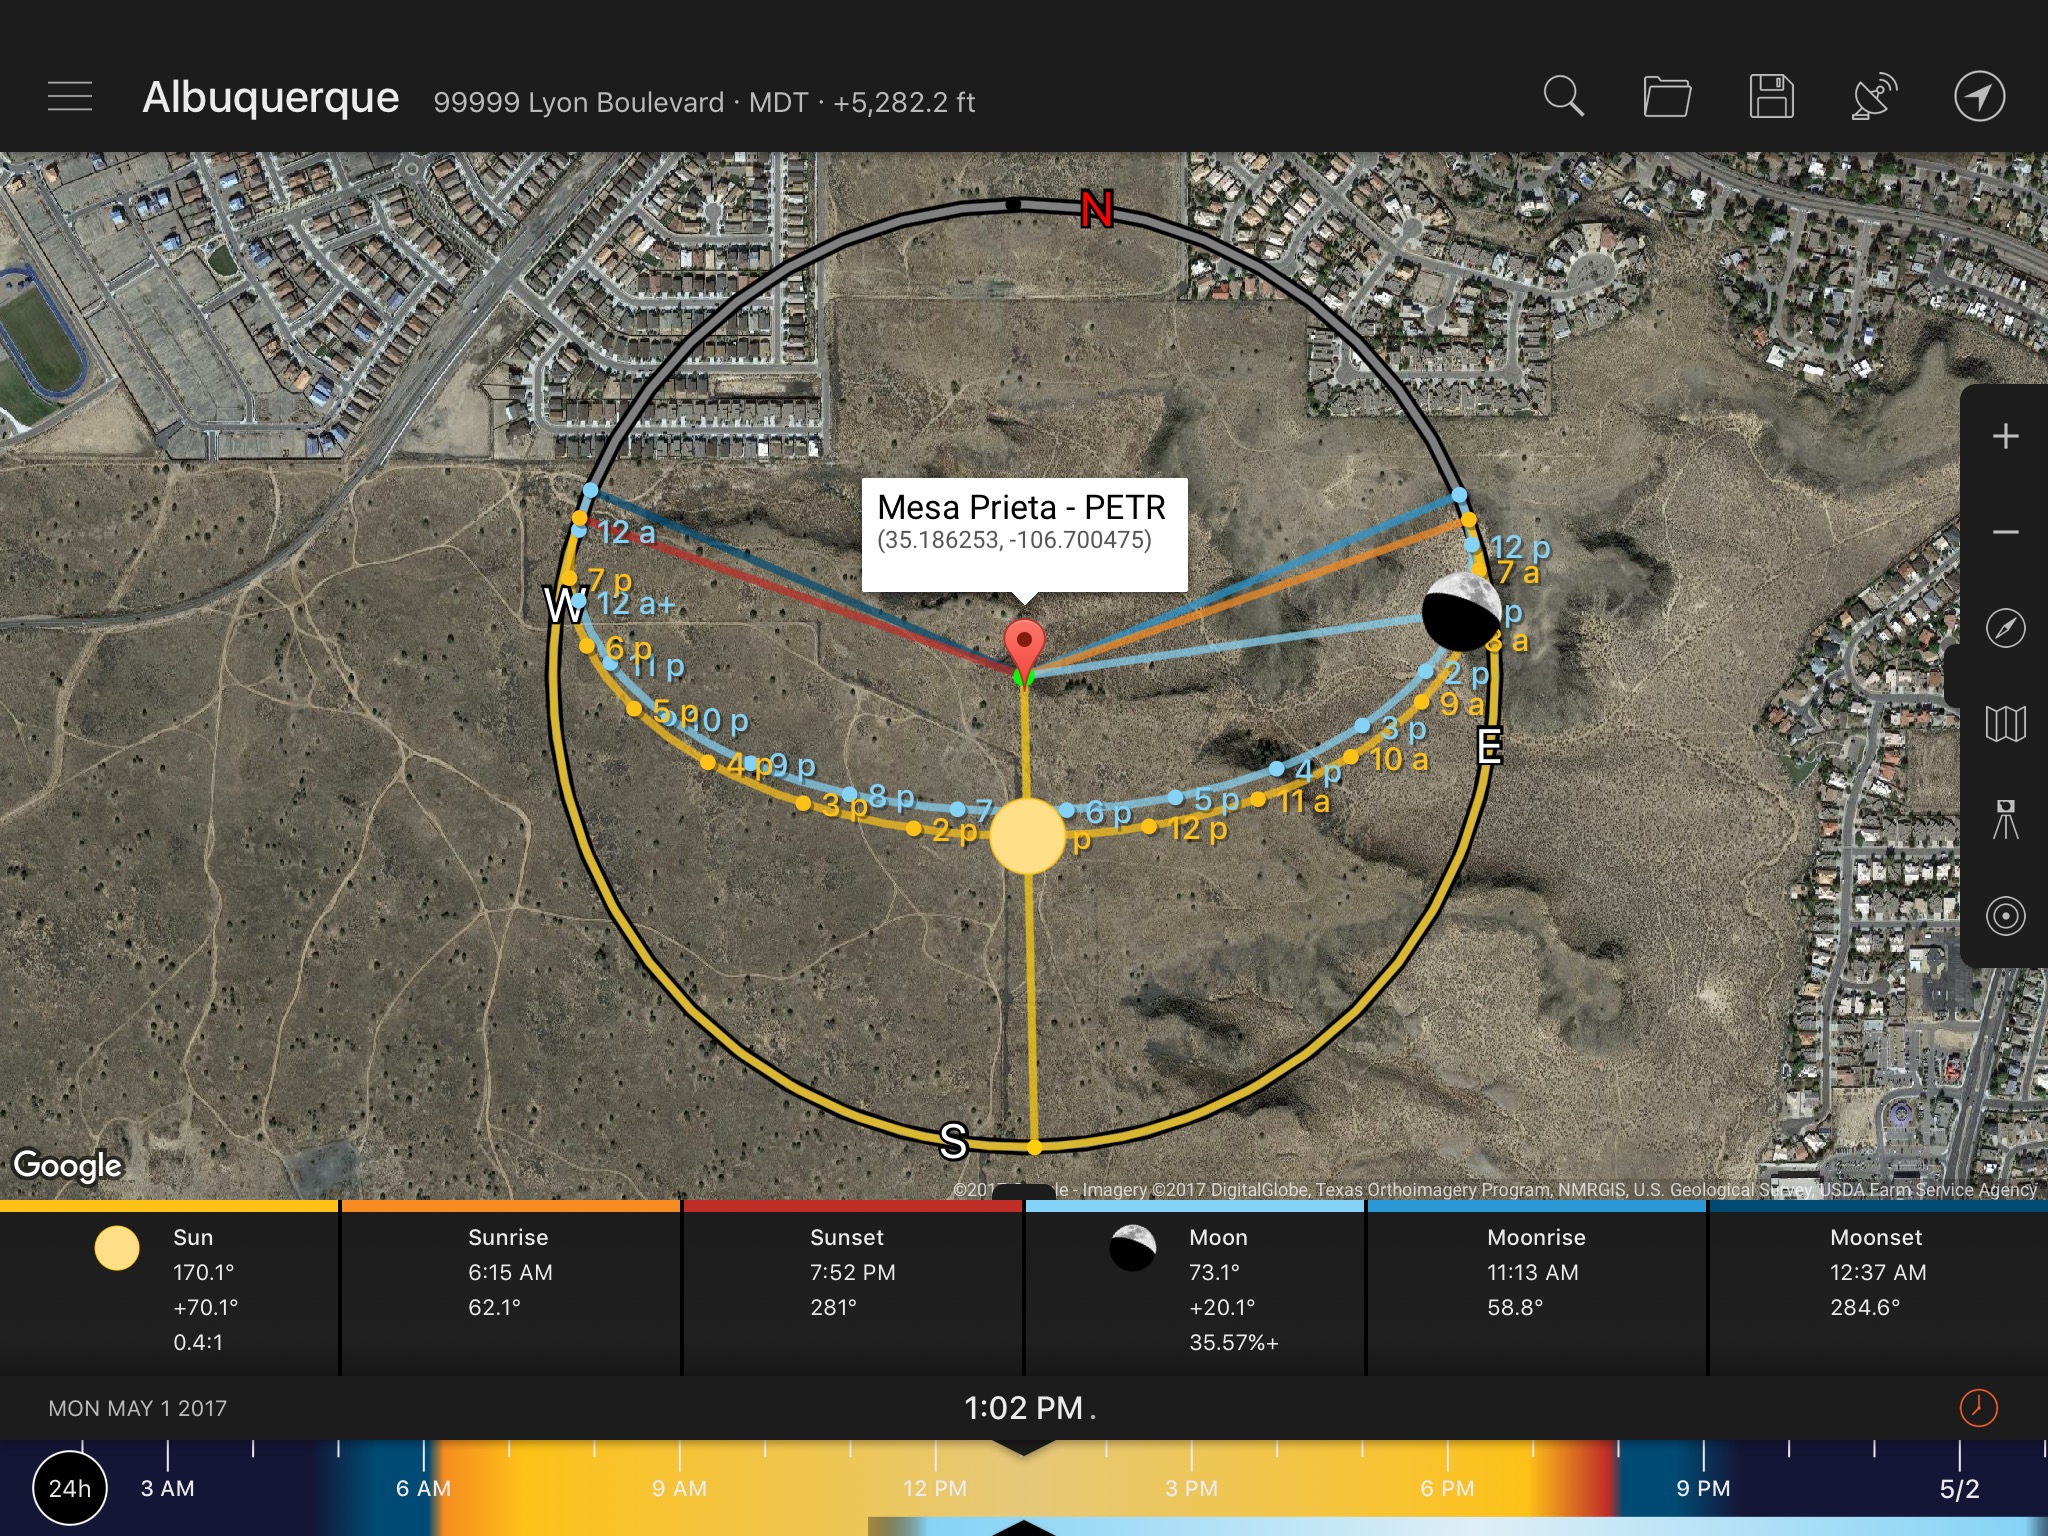 Sun Surveyor map view – Mesa Prieta, Petroglyph National Monument You can use your phone’s camera to place your current location in the center of the sun and moon transit lines and path simulators. You can also select an automatic elevation lookup to factor elevation into the light indications. The 3D compass view overlays sun and moon arcs with cardinal directions, and nothing else. To get it to work accurately, you need a mobile device with GPS, and tap the location tracking arrow at the screen’s upper right. This lets you track the sun’s location in outside facing in any direction. You can search for, save and retrieve locations by tapping the icons at upper right in the iPad version. Tap the location on the top bar to do it with the iPhone (this works with iPad too). On the right side of the screen, you’ll find icons to zoom in and out, lock the compass direction, change the map type (normal street, satellite, street/satellite hybrid, terrain), lock your location even when you drag the map view, and lock the target point while you drag the view. Unlock the target point and double-tap to instantly re-center on it. On the other hand, unlocking the location instantly returns you to your selected point. The street view gives you Google’s view of your present location if there is one, with selectable altitude and azimuth angles. The sun position is overlaid on the picture, so you know where it will be at any date and time. This is another pre-visualization help. As if that wasn’t enough, the app’s Ephemeris gives you a listing of sunrise, sunset, moonrise, moonset, and so-called Golden Hour and Blue hour photography times. The last two are somewhat arbitrary guides to when you’ll have warm daylight, and cooler-but-colored light before and after the sun’s in the sky. Opposite-Horizon and Post-Sunset It pays to look away from the sunrise or sunset horizon. The opposite horizon sometimes has better color. Why is this? The light has to pass through more air and then reflect through it again before it reaches your eye – or your sensor. The extra air scatters blue light higher up for warmer colors, but reflects the blue light lower down. And voila! You get a mix of Blue Hour and Golden Hour red light. 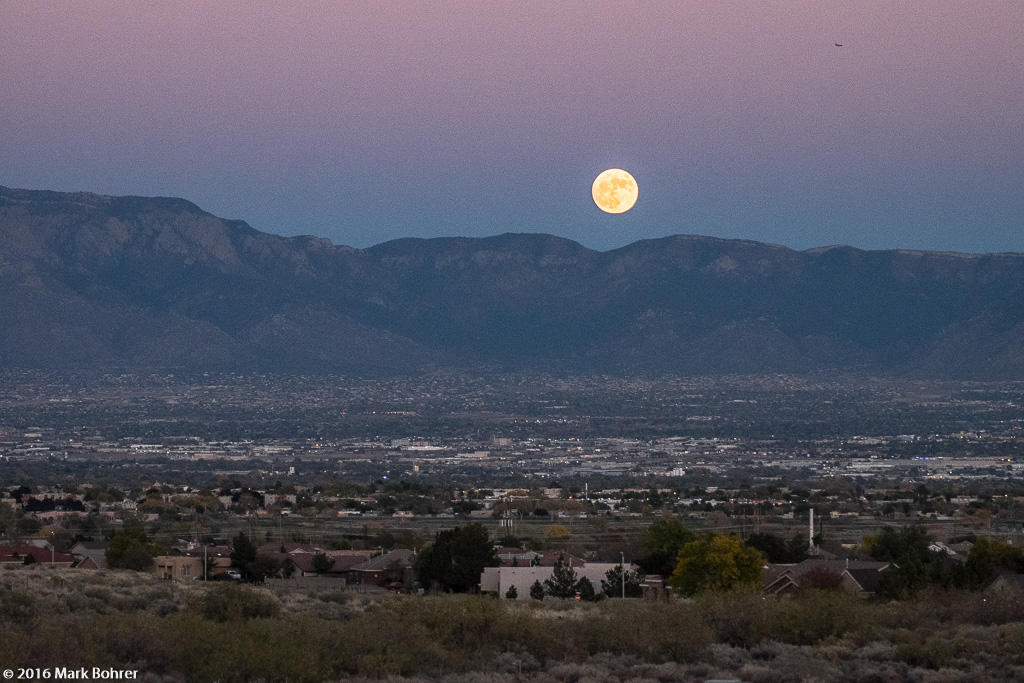 Opposite horizon at Blue Hour, mix of blue and higher-in-the-sky warm ‘Golden Hour’ sunset light – Supermoon Near Mesa Prieta, Petroglyph National Monument Just because the sun is below the horizon doesn’t mean the light is gone. In the minutes after sunset, light reaching your eye passes through even more layers of air, but at a steep enough angle that its longer red wavelengths pass into space. Short wavelengths of violet, blue and green light get scattered and diffused. These colors light up the post-sunset landscape, giving blue hour its name. The duration depends on your global location and time of year. But Wait – There’s More Not content with showing you where the sun, moon and their shadows will be, TPE’s creators Crookneck Apps came up with something to superimpose a lens’ viewing angle on the map view of any location. Photo Transit lets you choose your direction, camera and lens, and gives you an estimate of what you’ll take in. You can theoretically pre-plan your big landscape shots before arrival. In practice, it depends on map detail and your lens-camera field of view. 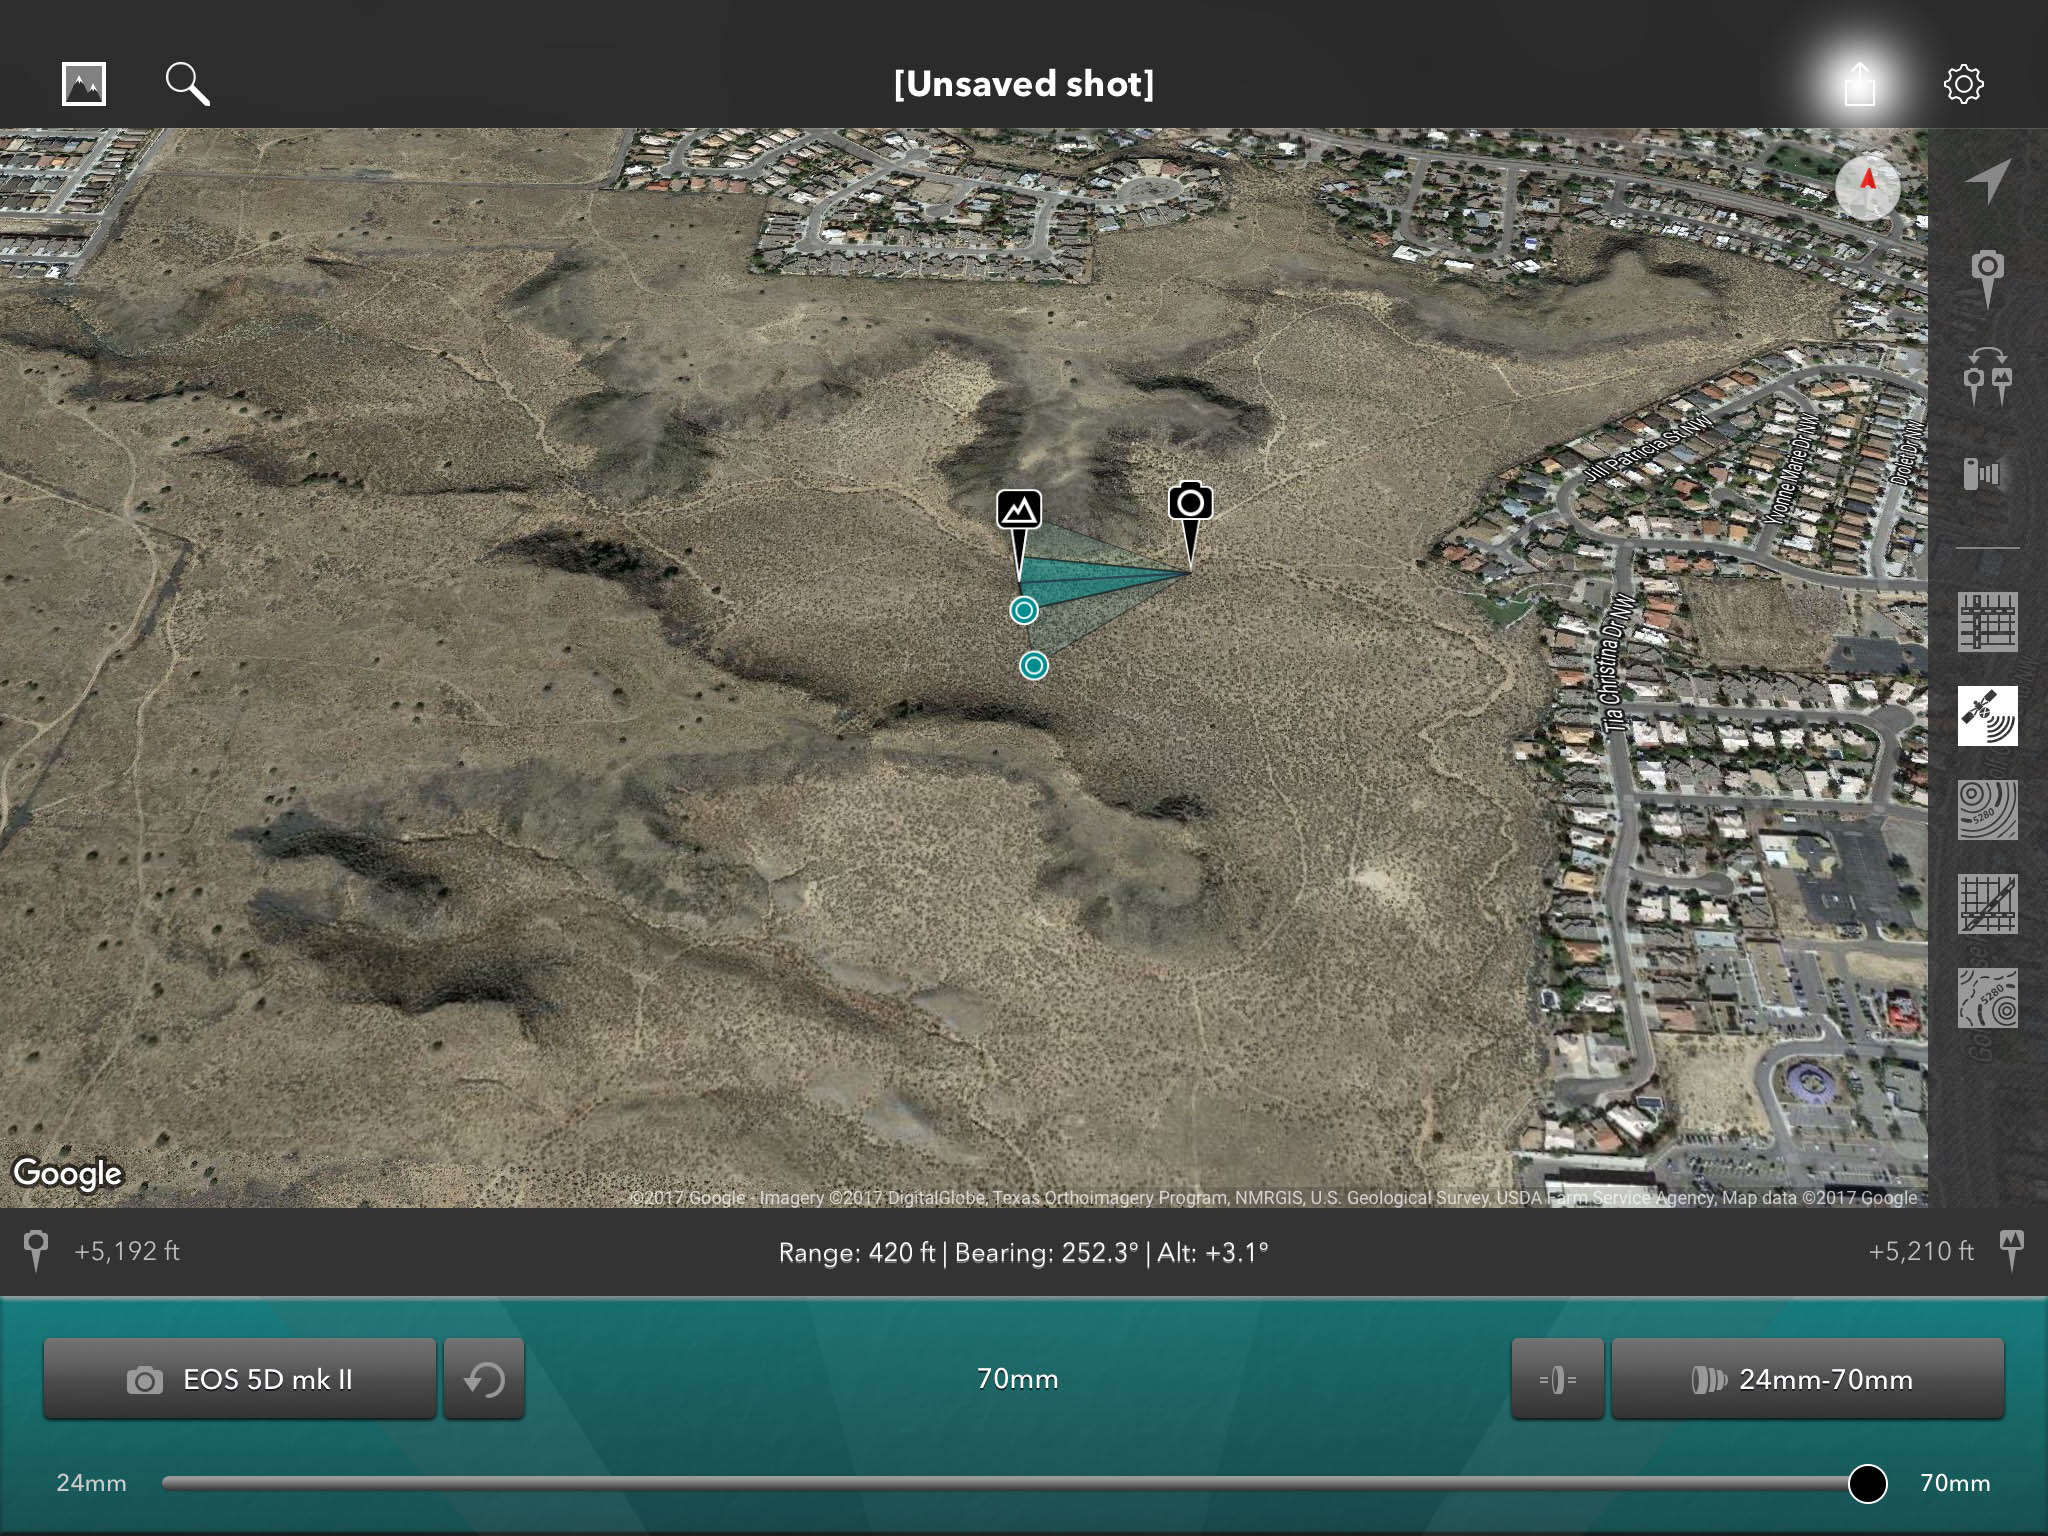 Shot view on the map, Piedras Marcadas – Photo Transit With Google terrain, you get the shadows as they would appear at your time of day, and gross terrain features. Tap, hold and slide to move camera and subject positions, and you’ll see a green triangle showing what you’ll get. Choose a zoom lens, and you’ll see inner and outer triangles showing the possible fields of view. If you’re shooting single-length primes, you can display the fields with two or more at the same time. 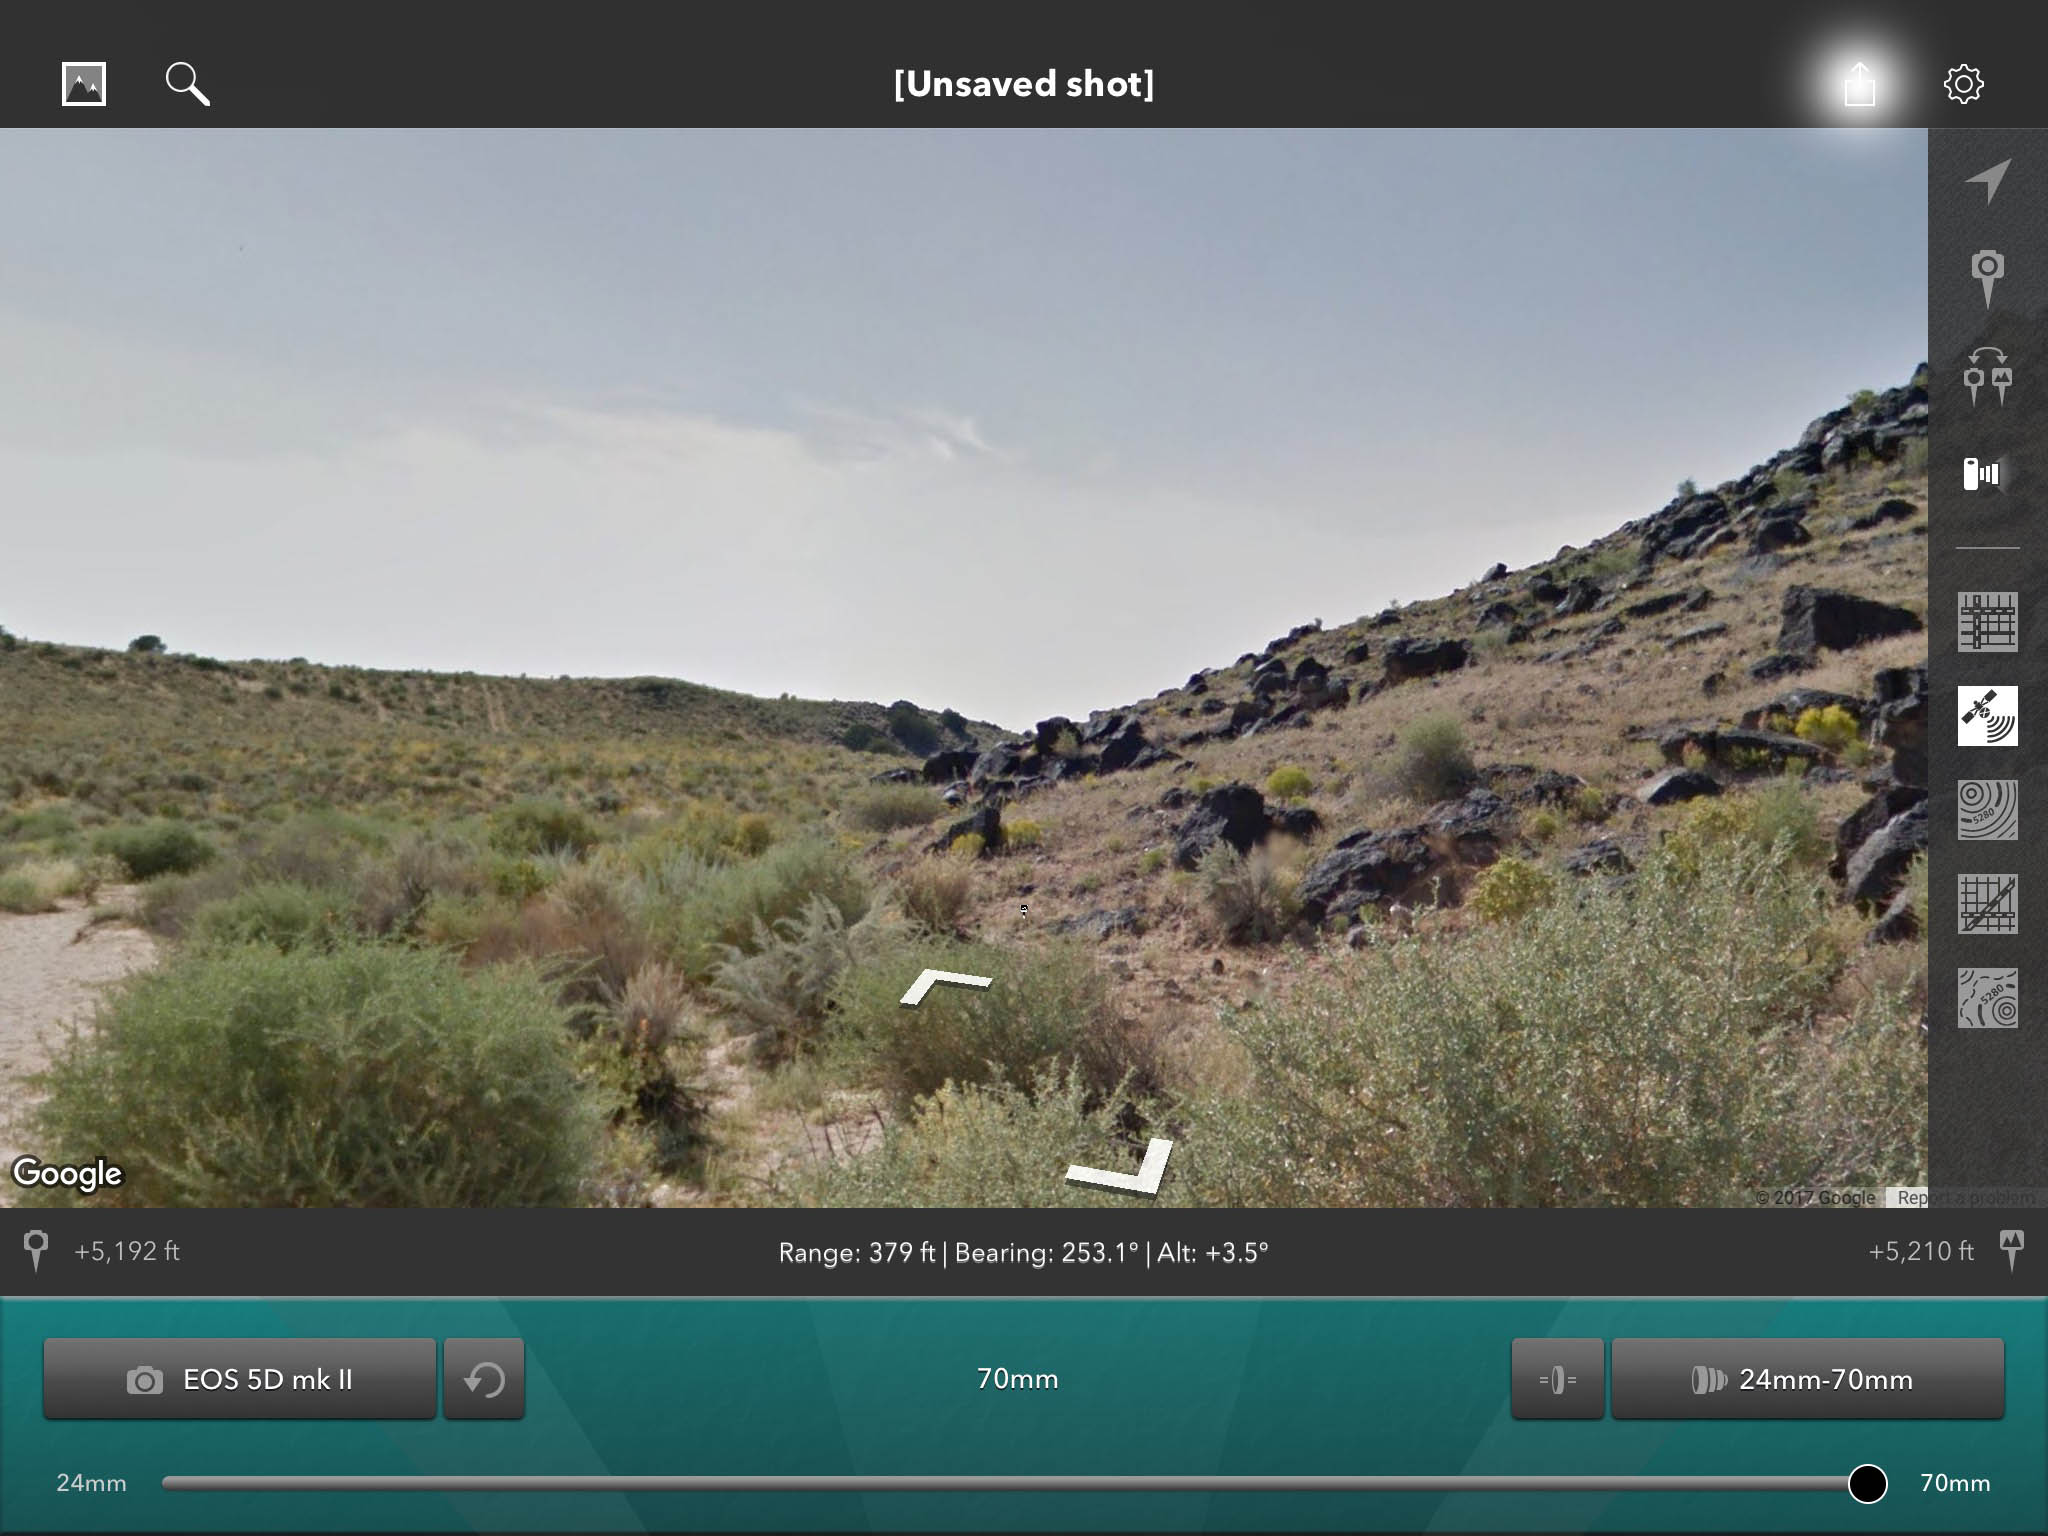 Street view, Piedras Marcadas – good for gross planning in Photo Transit, but that’s about it Once you set up the shot on the map, you can use the built-in link to Google street view to see roughly what the shot looks like. You can adjust the zoom coverage using the slider at the bottom of the screen. Again, this is an undetailed view – don’t expect to see individual petroglyphs for your shot. Remember there may be no Google street view for remote areas without streets – think Chaco Canyon or Cabezon peak. Photo Transit requires entering individual camera bodies, then entering all the lenses you use with each body. If you have a couple cameras with the same lens mount, you’ll enter the same lenses for each. Tech support at Crookneck Apps told me this was a design decision based on early user feedback. The app also adjusts the field of view for each camera’s sensor coverage. Many of us have multiple cameras with the same mount. I use Canon EOS 5D mk II, 1D mk II and 7D bodies, and had to enter the same lenses over again for each camera. The same thing happens with my Leica and Fuji X-E2 bodies using the same M-mount lenses. It would be better to make this selectable in the settings so you only have to enter lenses once for each camera maker. The app also lets you create shot lists and plans, add them to your calendar, and share them with friends and colleagues, useful for multiple photographers on a shoot together. However, like wildlife phoptography, ruins and petroglyph photograpohy can be solo endeavors. How you use any of these apps depends on your working style. Crookneck Apps support replied to my email question in less than a day. This is excellent support, especially when you need quick answers in the field. More Information The Photographer’s Ephemeris, accessed from http://photoephemeris.com Photo Transit, accessed from http://phototransit.com Sun Surveyor, accessed from http://www.sunsurveyor.com Understanding Golden Hour, Blue Hour and Twilights, accessed from https://petapixel.com/2014/06/11/understanding-golden-hour-blue-hour-twilights/ – Diagram of different light versus sun position above/below the horizon. |
(408) 483-3782
Curious about how to shoot ruins?(408) 483-3782
Recent Comments