|
Everyone shoots them. But most sunset shots make you yawn – see one end-of-day color riot, and you’ve seen ’em all, right? InfoTrends estimated all of us shot 1.3 trillion photos in 2015. Of that number, a large percentage were sunsets. (If all 1.3 trillion pictures were printed and stacked, they’d reach a third of the way to Mars at its closest.) So how do you get your sunset shots to stand out from all those others, or at least get you more than a pat on the shoulder and a “that’s nice” comment? Put Something In It It took awhile when I was a kid, but I got to the point where I could recognize great light for pictures. (I’m still learning.) Then I began to realize I needed something cool to put in it. Sunsets have a lot of what adventure photographer Galen Rowell called image maturity – they’re boringly common. The color can’t be your picture’s entire subject. It needs something else.  Daisy and big pipes, El Prado, New Mexico I’ll sometimes place a strong foreground object – drainage pipes, a dog, a wagon, trash – to give my viewer something to fixate on. I want them to wonder what the dog is doing there, and maybe what’s in the pipes she’s sniffing, while they ooh and aah over the color and sunbeams. Then I may include the curve of a trail or road to lead the viewer’s eye towards the distant horizon. Sometimes this is an actual trail. Other times, low-angle sunlight picks out a lit pathway of sage or other tall obstructions. 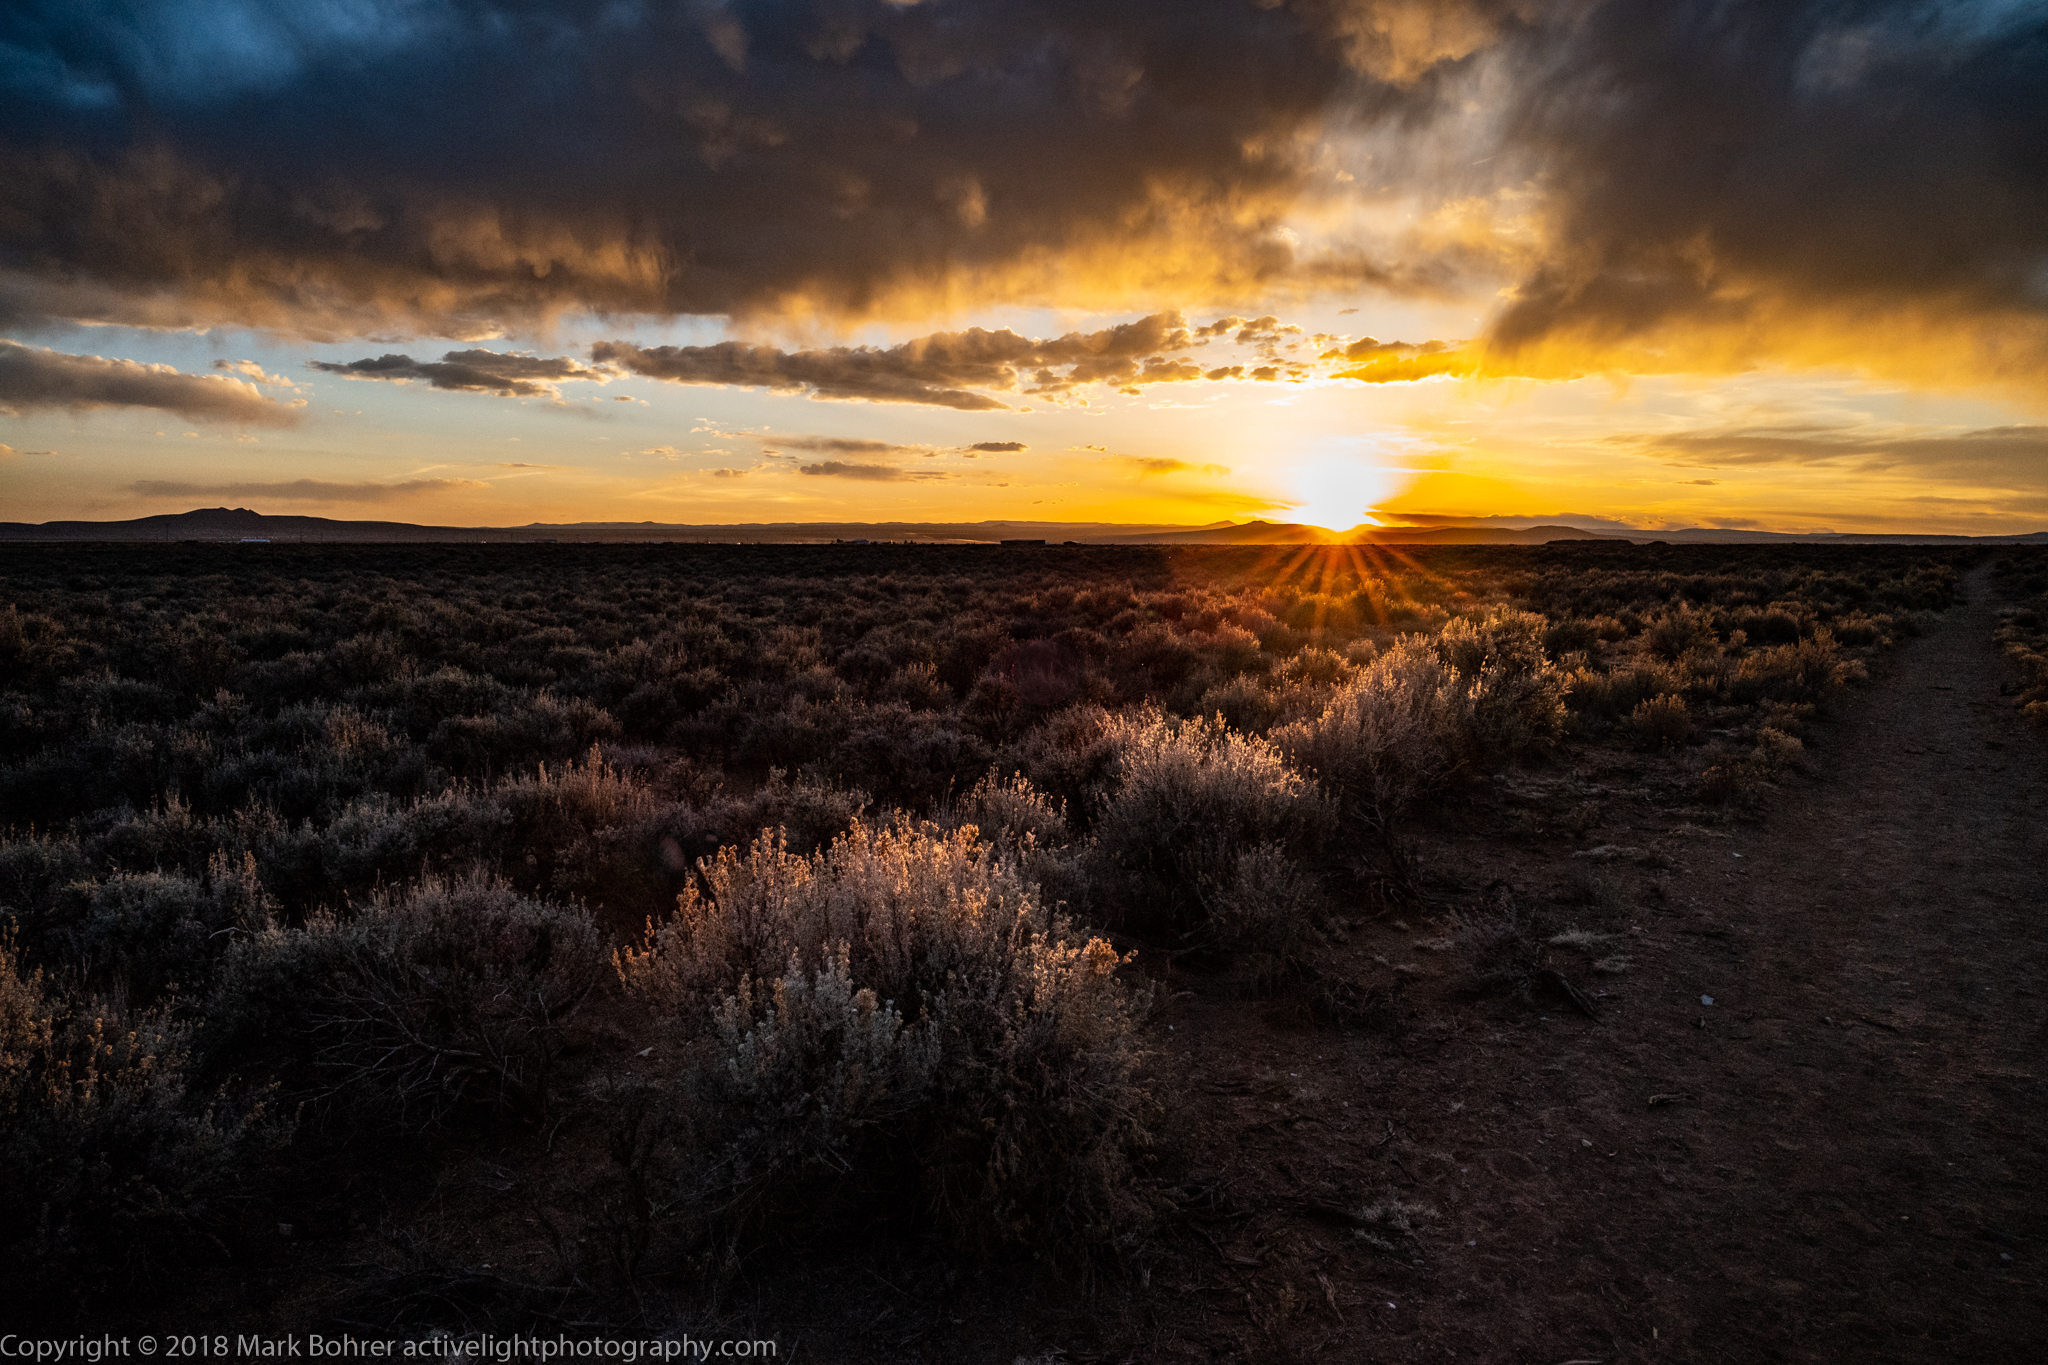 Sunstar and leading sage light, El Prado, New Mexico Make A Sunstar Aside from the usual warm reds and oranges (more later on why you get them), I’ll also look for diffraction sunstars – naturally-occurring through tree branches, or at the edges of buildings or jagged mountains – or I’ll make my own by reducing my lens aperture to at least f/5.6. Smaller apertures can be better for this – f/8 or f/11. (By f/16, you’re starting to cut down sharpness by forcing all the light through a small hole to get to the sensor.) Any way I get one, I’ll move around slightly until I see a sunstar through my camera’s viewfinder. A mirrorless camera like a Sony A7 series or Leica SL will show you the effect of lens aperture looking right through the stopped-down lens. Hit the depth of field preview button, and a dSLR will also show you sunstars. The number of beams in the sunstar depends on how many aperture blades your lens has. An odd number gives you twice the number of beams. But an even number of aperture blades gives you the same number of sunbeams. I generally use lenses with at least 7 aperture blades. Most modern lenses have at least that number. Once you get more than 15 blades, it can be tough to pick out individual sunbeams because there are so many. Older lenses with straight-bladed apertures produce more prominent sunstars. If you stop down too much, straight blades start to form a rounded aperture, and the sunstar will be less prominent. You’ll need to try out different apertures to find the effect you want.  Pat and Daisy on the horizon, El Prado Put Something Cool on the Horizon – and Lead ‘Em To It Then I place a prominent feature – a person with a dog maybe – near the horizon. I’ll use the trail or a road to lead a viewer’s eye right to that feature, and for an unonstructed view of it. A trail makes a gap in the sage or other wild plants that’s perfect for your interesting person or dog. I’ll also shoot the person / dog away from the horizon, if there’s good backlight / rim light to make them stand out enough. I’d like additional taller features in the picture to provide more paths for my viewer’s eye. 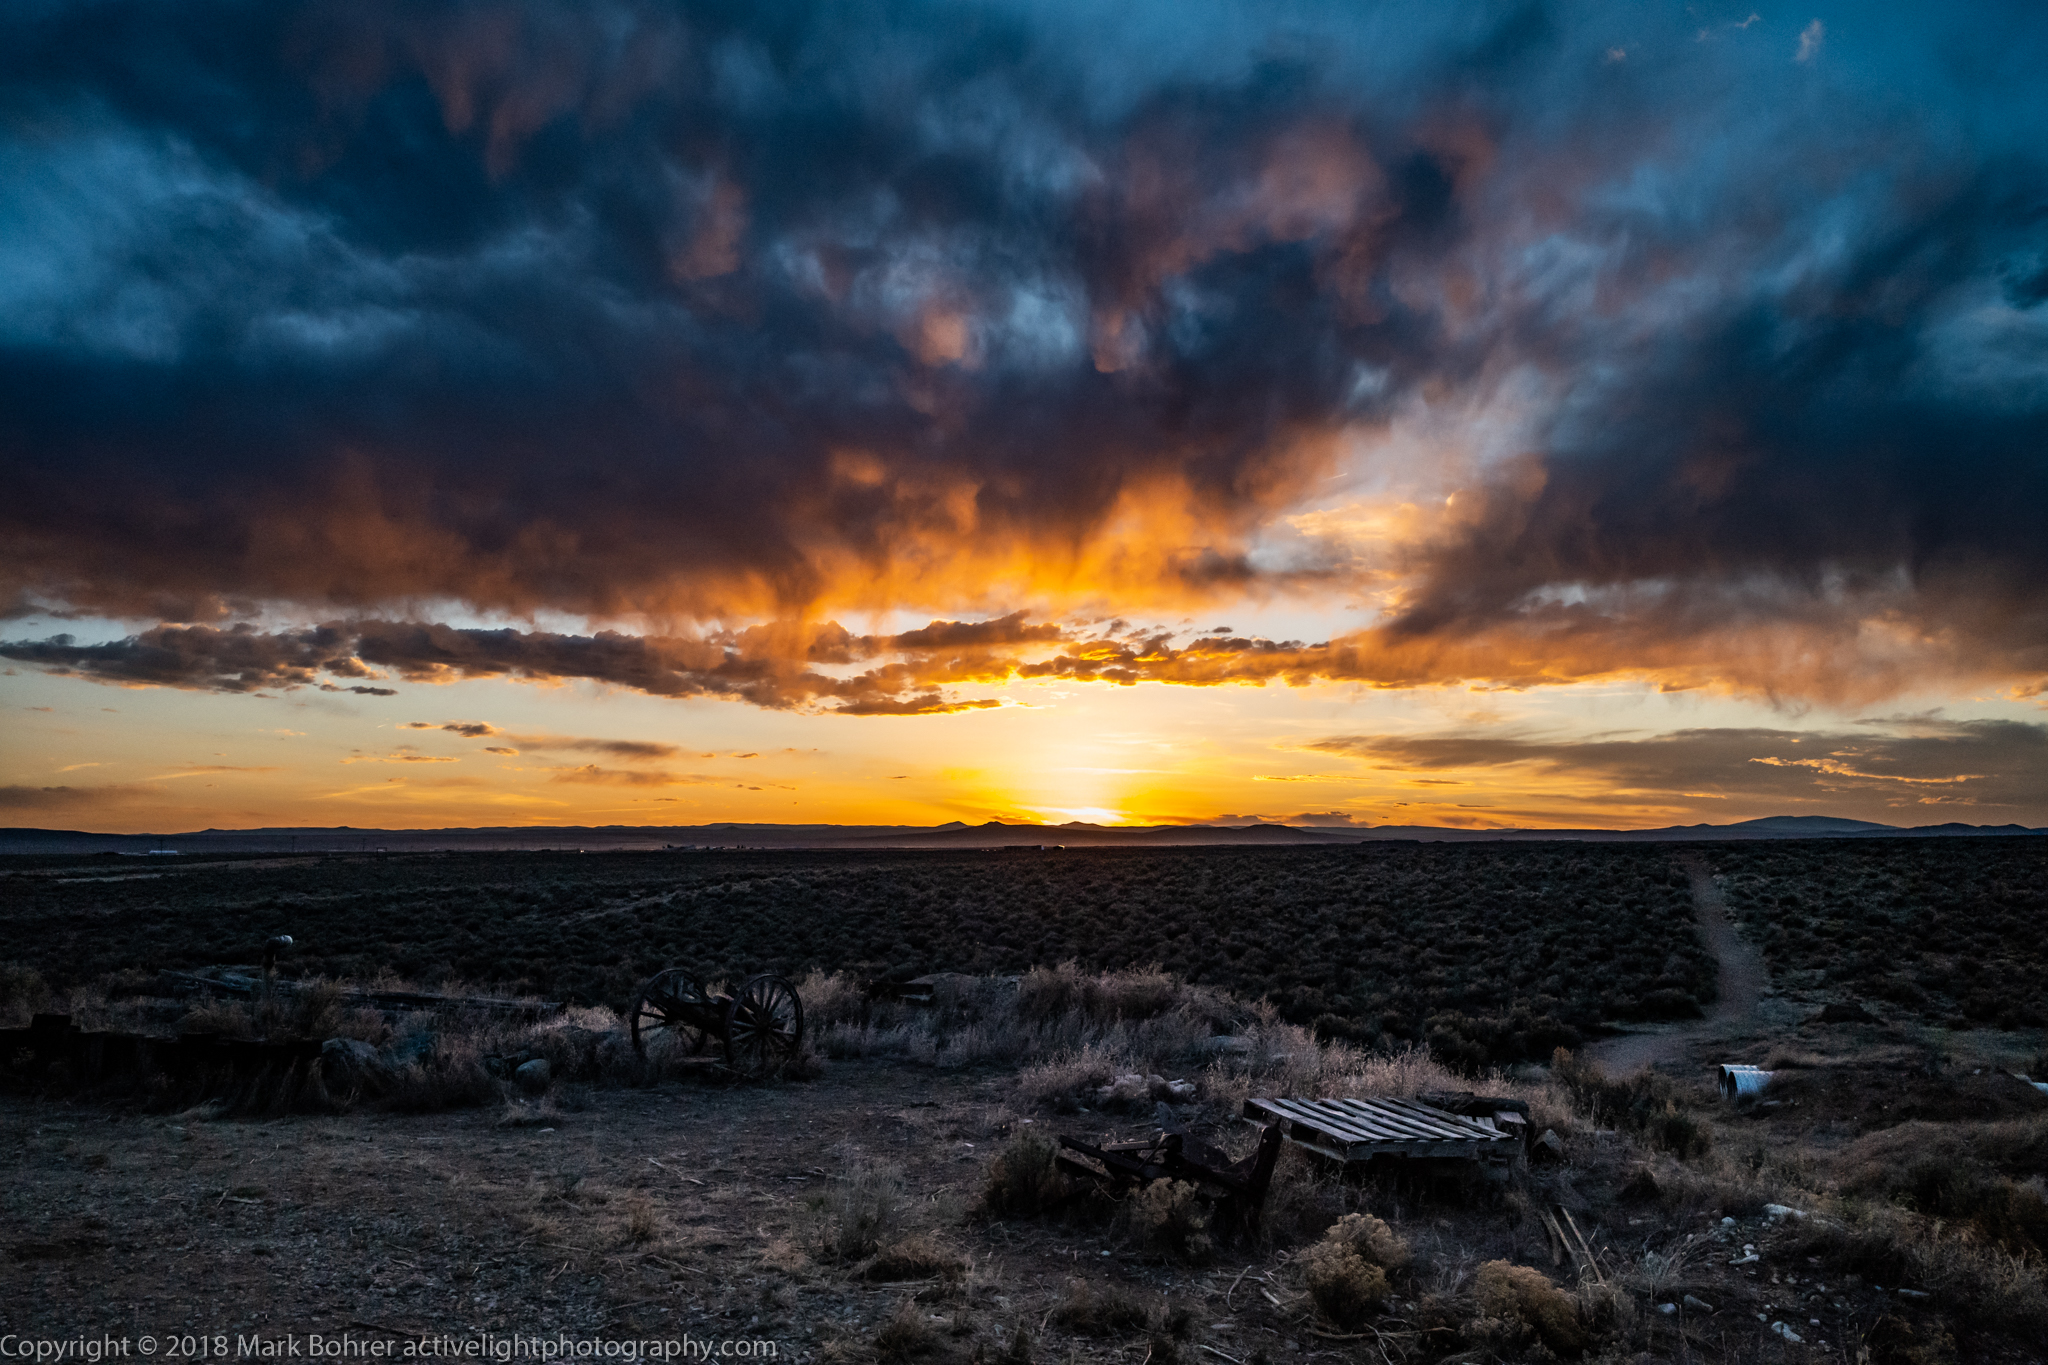 Clouds, foreground platform, trash and leading lines Make it Cloudy – and Wait I’ll also look for clouds on the horizon. I love clearing storms, since they usually give me cloudy horizons with great sky textures without completely obscurring the scene. Clouds a little higher in the sky also give you a great canvas for sunset colors. Finally, I wait. It ain’t over ’til the colors are gone. I’ll also look over my shoulder to the opposite eastern horizon. Sometimes the refleceted colors over there are better than the direct sunset. Taos Sunset All of this came together recently on a trip to the Taos Lilac Festival. We’d chosen an RV campground a few miles away from Taos and its light pollution. We’d noticed spectacular light patterns, clouds and color the previous night, and timed our dog walk for the end of the evening. Weather conditions were similar, so we hoped for a sunset repeat. It wasn’t identical, but it came close. 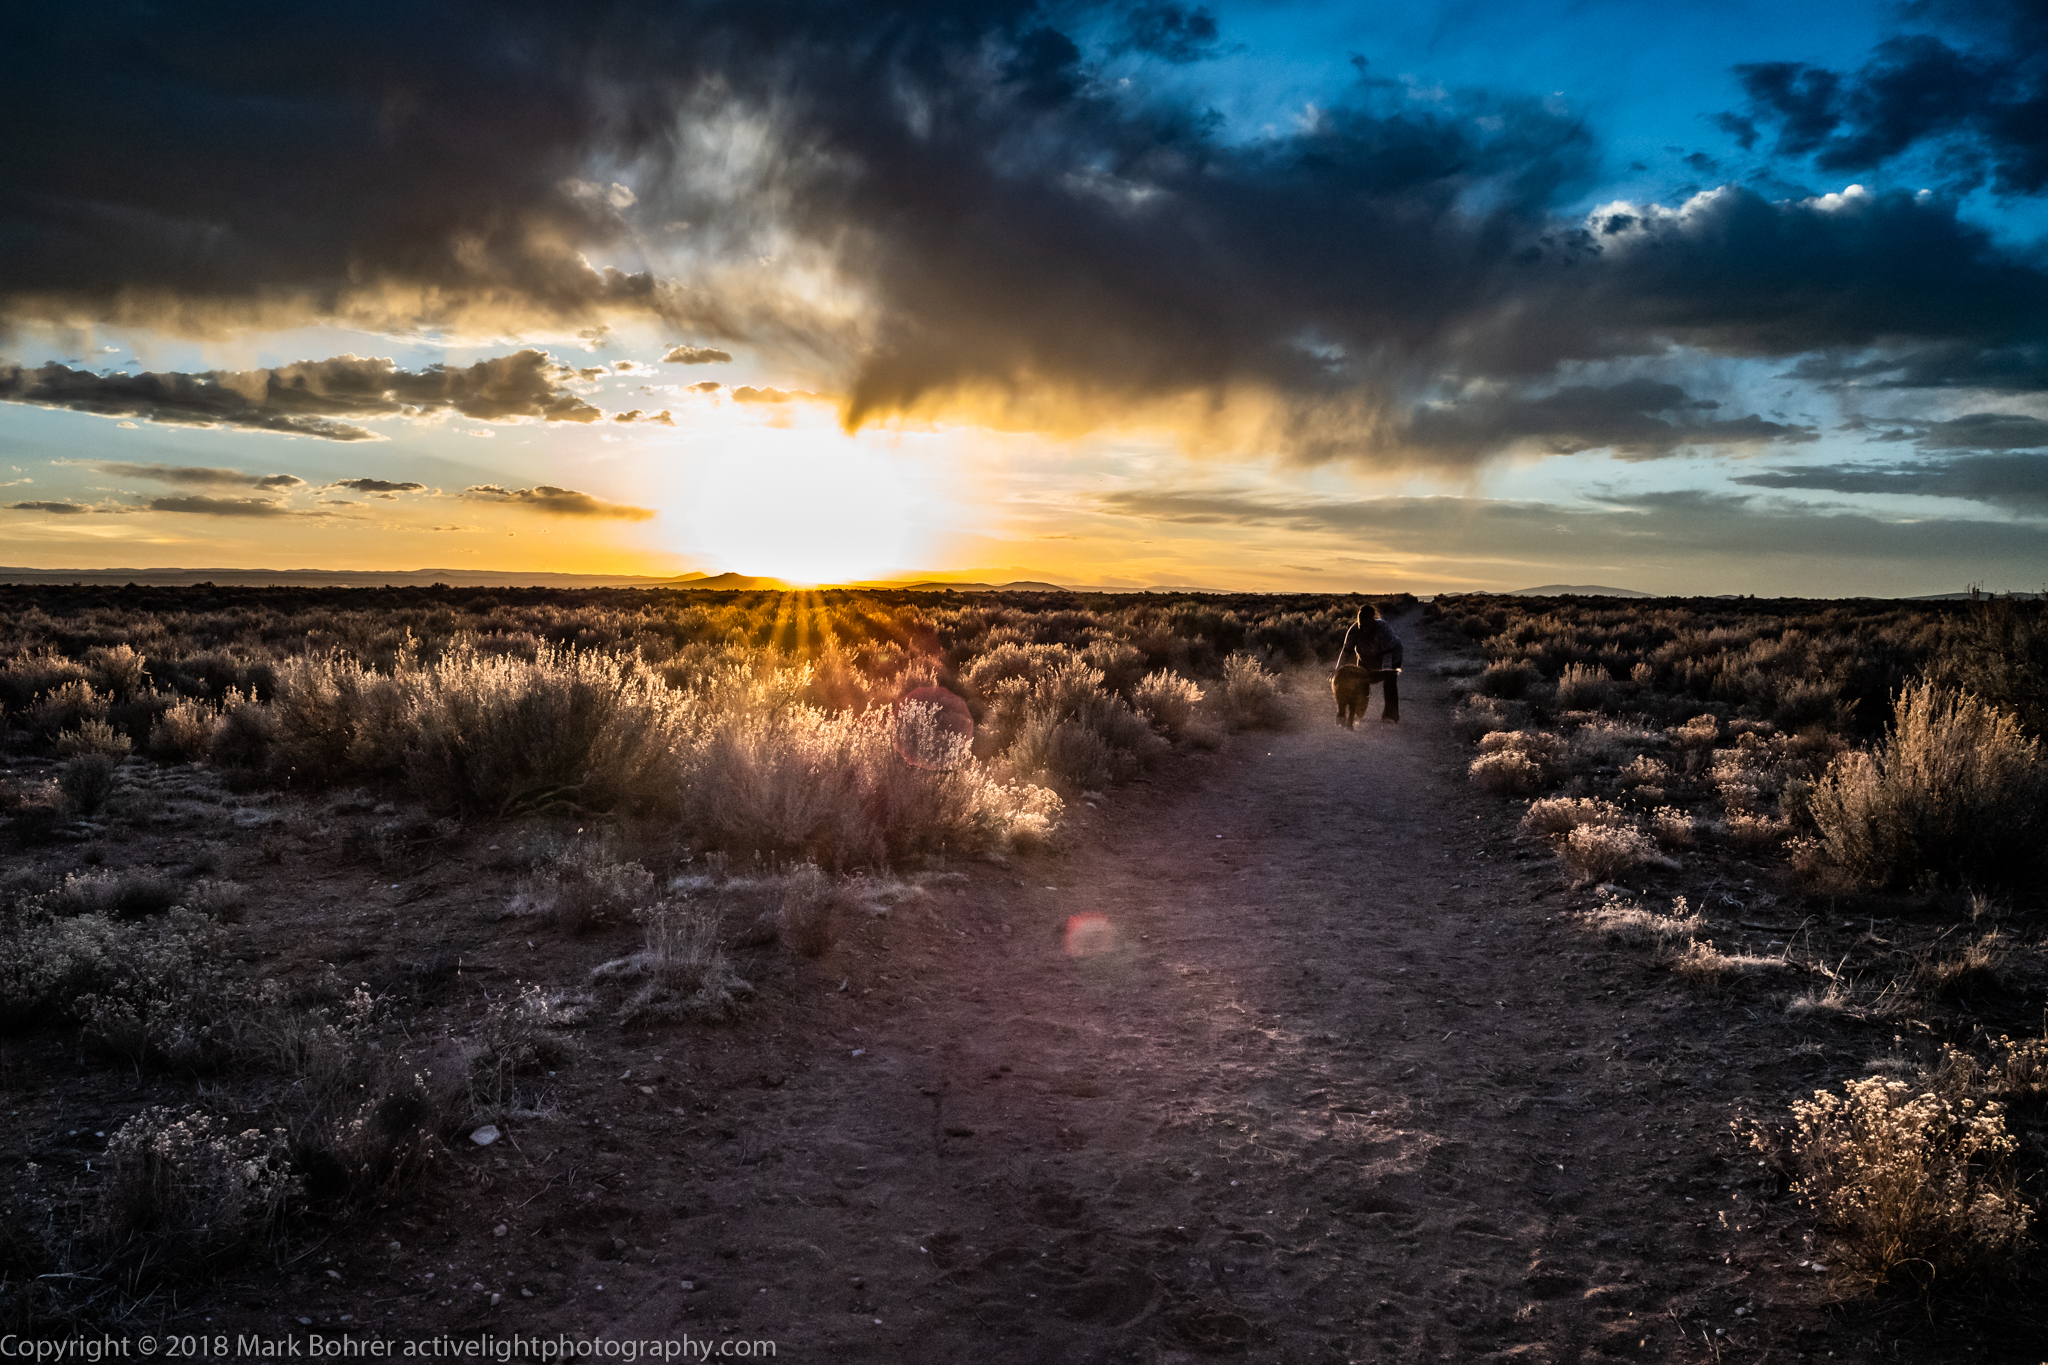 Pat and Daisy rim-lit on the trail The path led west from the campground. We let our Bernese Mountain Dog Daisy loose to enjoy the smells. As usual, Sheltie Buzz stayed close to me even off leash. We relaxed in the cool evening on Taos Mesa near El Prado, New Mexico, and enjoyed the light show. I like to wait behind while Pat and Daisy enjoy walking ahead, often using them for models. This time the trail gave me a leading line to their silhouettes, just what I was looking for. I also got eight to eleven visible beams of a sunstar diffracted by a mountain and the 11 straight blades of my 24mm f/1.4 Summilux-M ASPH lens. While I didn’t need an f/1.4 lens to shoot a landscape, the lens drew sharply and without much flare at f/11. Taller sage outlined the trail and gave another backlit path leading into the picture. After topping the ridge for the best view, we turned around. Pat and Daisy headed for the RV while I kept shooting. The lightshow continued a good 20 minutes after the sun dipped below the horizon. 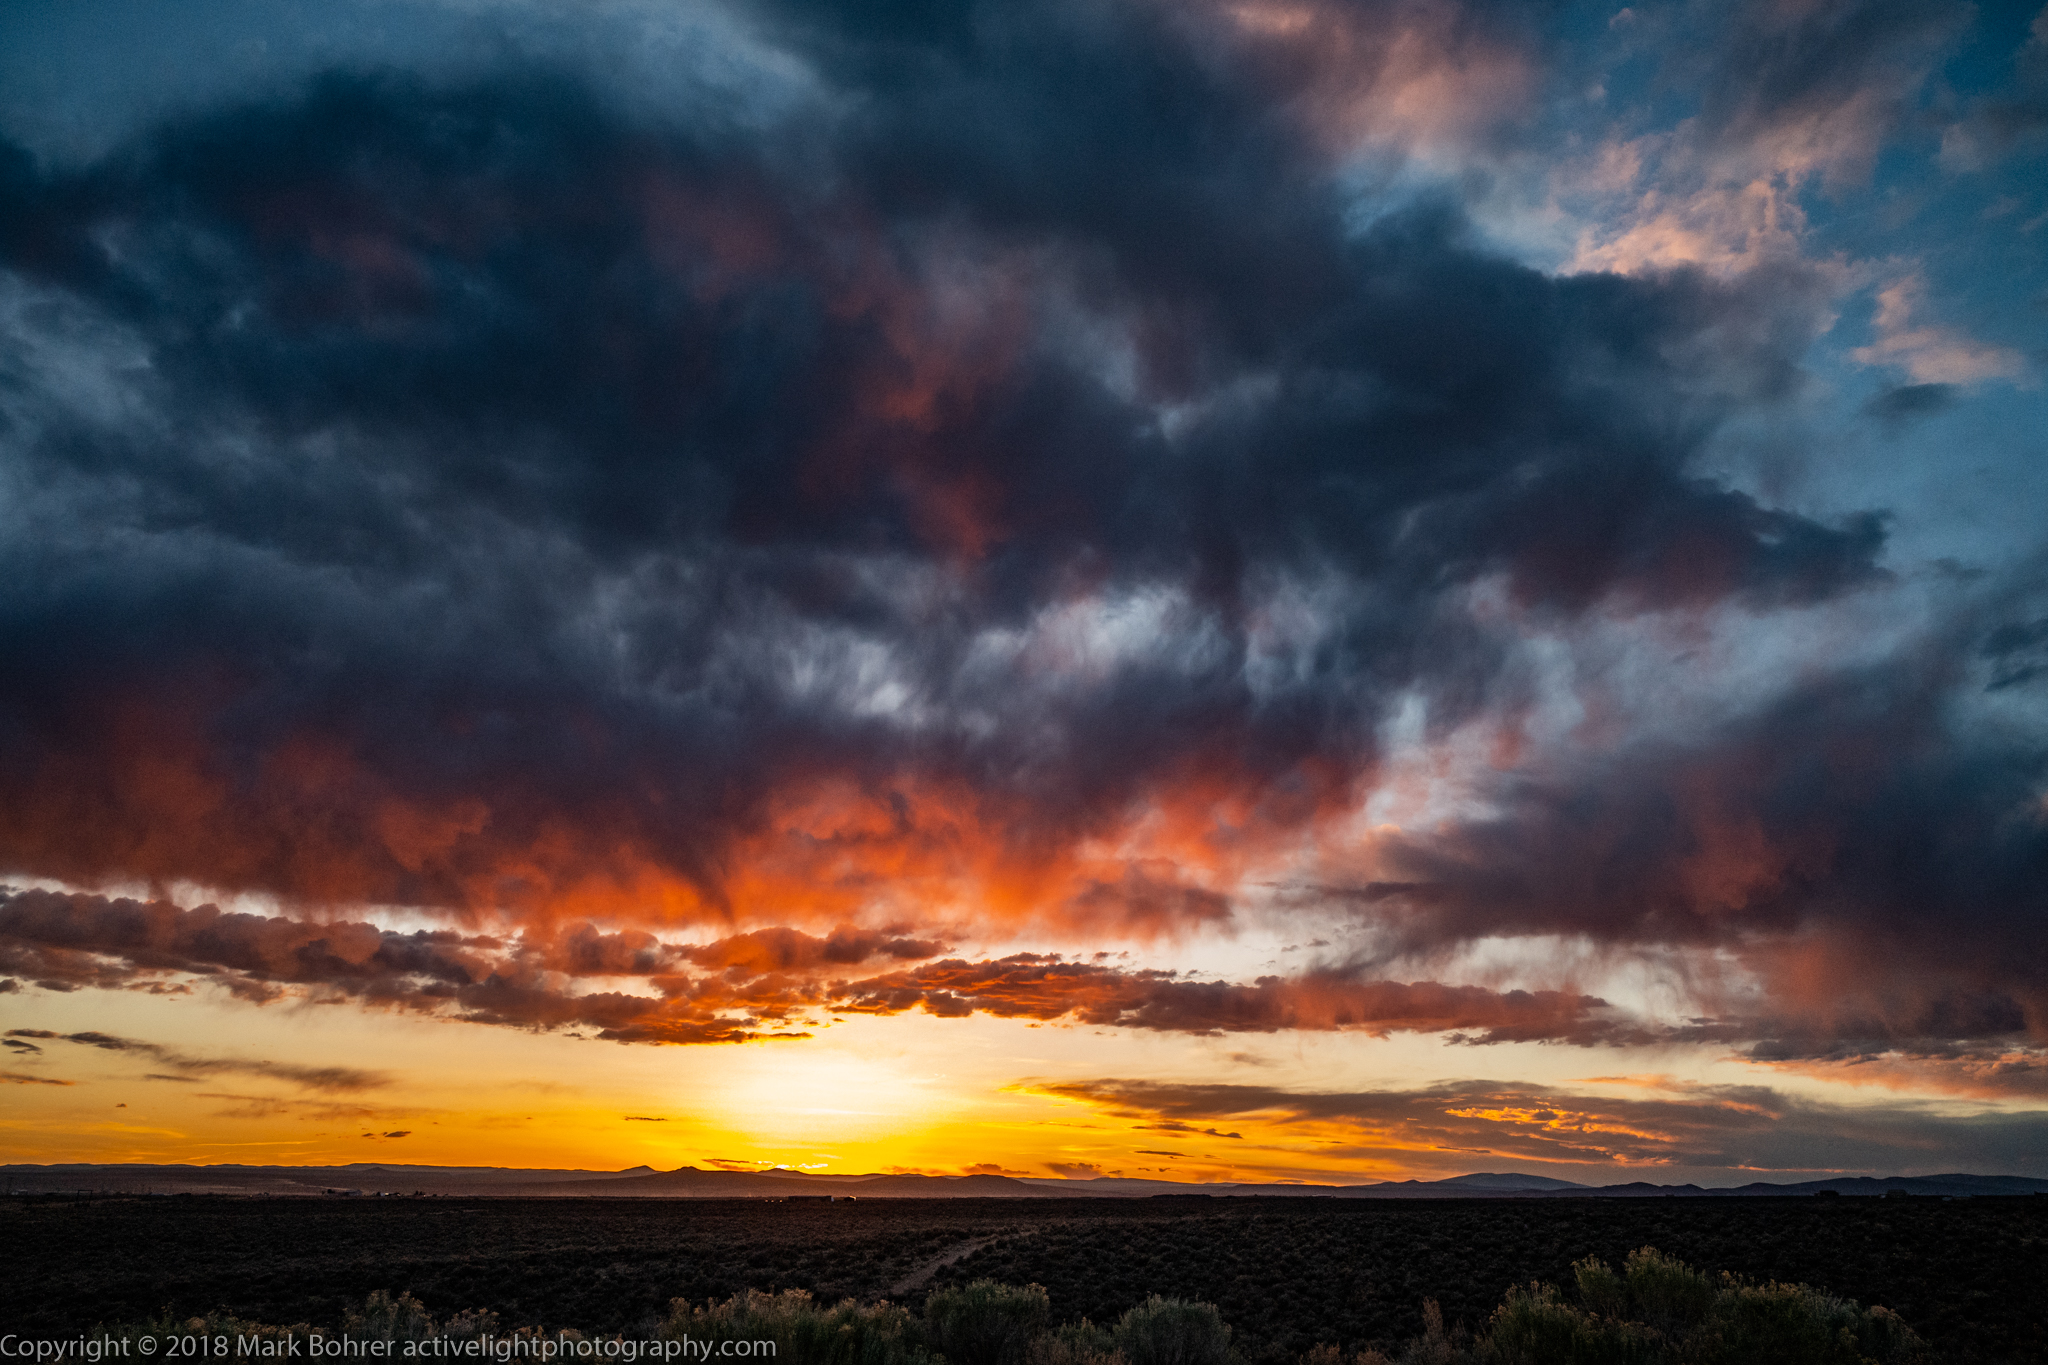 Cloud and sky color 10 minutes after When the colored light was finally gone, I reset cameras and lenses for the evening starfield – but that’s another story. Shot Notes I can get away without it, but a tripod lets me shoot at lower ISOs and smaller apertures / wider depth of field. My travelling tripod is an old Gitzo G1127 mk II carbon fiber model, topped with a Really Right Stuff BH-30LR head. I usually use it with the center post collapsed, since that extended post can vibrate much more than the rest of the tripod. Every camera and tripod-socketed lens I own wears an Arca-compatible quick-release plate, with L-plates on the cameras. L-plates allow shifting from horizontal to vertical without flopping the tripod head’s ball into its drop notch, keeping the camera centered over the tripod. I’m always carefully certain the head’s lever relase is tight on the camera’s L-plate to avoid unintentional (and expensive) nose dives. The bubble level in the head’s mounting tray helps me keep the horizon level and eliminates the leveling step in Lightroom later. My goal was a sunset-lit landscape, so I used a wide angle lens. If I’d wanted one of those big red ball shots where the sun itself is the subject, I’d use a 400mm or longer lens. Those pictures usually require a fair amount of pollution, dust or other particulate junk in the atmosphere to bring the sun’s intensity down, even when it’s on the horizon. Otherwise, your foreground detail will be lost in inky black shadow. In most wide landscapes, the sun will completely blow out the area around it when it’s in the picture. Wide angle lenses like the 24mm and my Sigma 14mm f/1.8 DG HSM Art minimize the area of blown highlights relative to the rest of the picture. Post sunset shots also eliminate most of the blown area with the sun safely in bed below the horizon. Test for Flare First Many inexpensive zoom lenses give you a line of lens flares, or may veil the image completely when you aim them anywhere near the sun. I discover this behavior with any lens before I go looking for keepers, and check pictures as well as I can in the field. When annoying flares show up in the image, I use Lightroom’s adjustment brush tool or spot removal tool to darken them or clone them out. Why Is It Orange and Red? And where does all that warm color come from? When the sun sinks low to the horizon, its light passes through a lot of atmosphere on the way to your eye. All that atmosphere scatters away the violet and blue colored light, then the greens and yellows. Finally all you’re left with is orange and red. Light is funny stuff – it gets bent in the extra atmosphere. This refraction means the sun is already physically below the horizon when you’re still seeing its big red ball through your long lens. More Information Stephen Heyman (July 29, 2015) Photos, Photos Everywhere. Retrieved from https://www.nytimes.com/2015/07/23/arts/international/photos-photos-everywhere.html Ken Rockwell (2008) Sunstars. Retrieved from https://kenrockwell.com/tech/sunstars.htm Oz Yilmaz (May 5, 2017) Leica Summilux 24mm f/1.4 ASPH Lens review. Retrieved from http://leica-review.com/leica-summilux-m-24mm-f-1-4-asph-lens-review/ Bryan Carnathan (2018-01-09) Really Right Stuff BH-30 Ball Head Review. Retrieved from https://www.the-digital-picture.com/Reviews/Really-Right-Stuff-BH-30-Ball-Head.aspx Ethan Siegel (February 13, 2013) The Physics of Sunsets. Retrieved from http://scienceblogs.com/startswithabang/2013/02/13/the-physics-of-sunsets/ |
(408) 483-3782
Curious about how to shoot ruins?(408) 483-3782

Recent Comments