|
One by One in the Bad Old Days In the pre-2007 days before Lightroom, I used stand-alone image management software (DigitalPro, no longer available) to import, keyword, caption and file my digital images. If a shot really needed it, I would import it into Photoshop and apply basic white balance, contrast and exposure tweaks. Maybe I’d use a little sharpening and digital noise reduction with the limited pixels and noisy files I got from older digital cameras. Very occasionally, a client might want some facial blemish reduction, and I’d set up mask layers and very carefully apply Photoshop’s clone stamp or later, possibly the healing brush tool. Any way you sliced it though, this two-step import-everything then edit one-file-at-a-time workflow was slow. The Lightroom Speedup But most images didn’t need Photoshop’s industrial-strength tools. And I wanted to speed up my workflow – after all, the less time I spend in front of a monitor, the more time I’m out shooting. So when Lightroom appeared as a stable beta in late 2006, I hopped on it. Fast-forward almost 11 years to today. Lightroom is up to version 6.10. It imports your image files directly from a memory card, lets you apply a group of keywords, caption, copyright and basic image tweaks to all imported files, and places them into the file folder structure of your choice. After import, you can adjust white balance, ‘clarity’ (mid-band contrast), full-range contrast, cropping, sharpening (micro-contrast), noise, perspective distortion, and separately control shadow and highlight exposure (my favorite feature). That should be more than enough, right? And Adobe’s programs are the best and perhaps the only alternative, right? Well, no, not really. Capture One Pro – Set Up Your Workspace Capture One Pro offers all of Lightroom’s adjustments and editing, with some important differences. I spent some time just setting up Capture One’s windows to offer the controls I use often in Lightroom. You add them by choosing the Window > Create Floating Tool menu, then choosing those you want. They all have similar names, though Capture One offers some variations Lightroom doesn’t. C1 gives you four different ways to adjust Clarity, in Lightroom a mid-level contrast adjustment you may be using to make images pop better. I dock my tools to the left side of the screen, in the order I’m used to from Lightroom. But I can put them in any column order I want in C1. 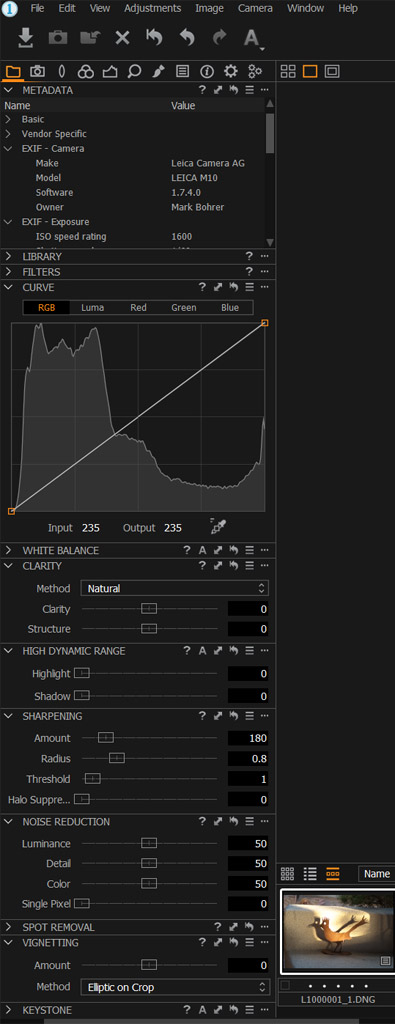 Capture One workspace setup on the left You also get regular contrast adjustments in C1’s Exposure tool, along with the ability to adjust brightness and saturation. Both programs have Curve control, so you can choose breakpoints and adjust contrast that way. But Camera One has several built-in curve presets to boost shadows, boost or cut midtones, enhance contrast luminance, or enhance contrast RGB (chrominance / color). C1 also lets you choose 5 point allchannels, applying light and dark endpoints plus three more intermediate points to all colors. Lightroom lacks the curve choices. Move That Filmstrip By default, C1 puts the filmstrip on your monitor’s right side. Place it at the bottom where you’re used to it by choosing View > Place Browser Below. 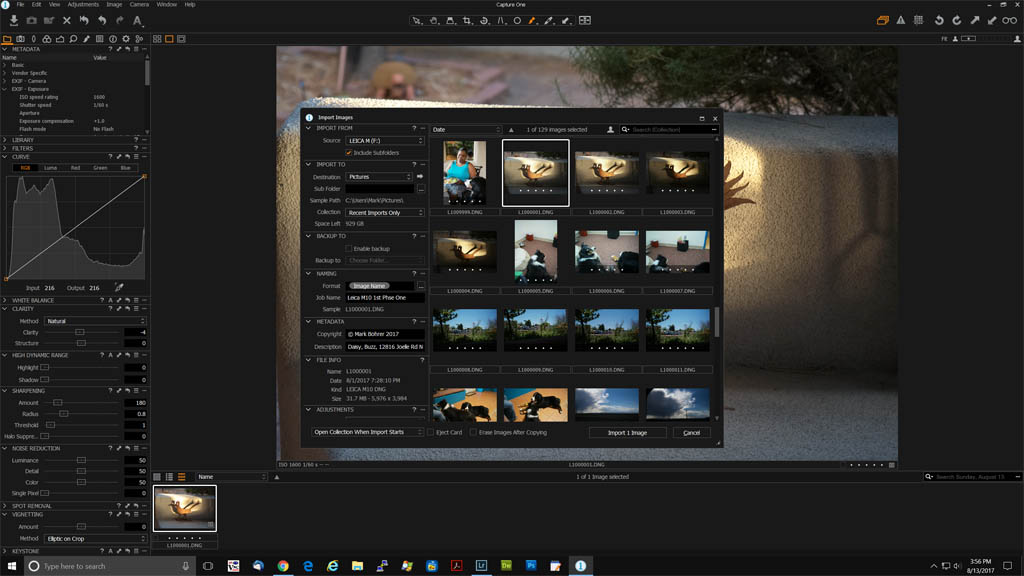 Capture One import screen Import Everything The import process is very similar in both programs, except for keywords. You can apply searchable keywords to a batch of imported files in Lightroom. In C1, you apply them after import. Go to Window > Create Floating Tool > Keywords to access the Keyword tool and enter them. I try to remember to do this right away, since it really saves me time in finding pictures later. Where Lightroom requires you to choose the import screen, C1 opens the Import Images chooser in the middle of your screen when you plug in a memory card. (You can also choose Import Images from C1’s File menu, or with the downward arrow to line icon at the upper left corner.) You’ll see thumbnails for all the shots on the card. And I mean ALL the shots – C1 lacks the ‘don’t import suspected duplicates’ feature Lightroom has. I sometimes don’t remember exactly which shots I’ve imported, or I import image subsets separately from different shoots on the same card, or I forget to erase a card after import and backup. Then I depend on this feature to avoid importing duplicates. But if you’re appending a set of keywords after the fact anyway, you might as well import the whole card at once and do per-shoot sorting and keywording afterward. 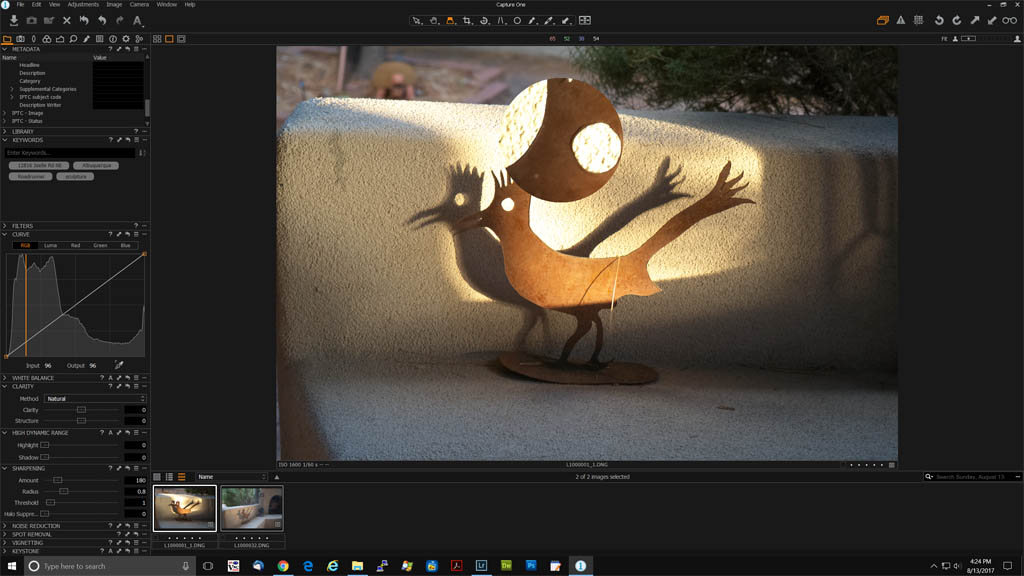 Loupe tool Pick the Sharp Ones The most noticeable difference is how fast you can pick sharp shots. Lightroom’s magnifier enlarges part of the image by your chosen ratio – to the large main window. I usually leave the magnification at 1:1, unless I need to examine an important detail for a big enlargement. Since Lightroom is enlarging to a big window, getting a sharp magnified preview can take awhile, sometimes a few seconds per shot, even working with fast local disk storage. C1’s Loupe tool magnifies a much smaller piece of the image to let you check sharpness of important details. You choose it by clicking the bottle opener icon at top center left. It’s much faster, since there’s a far smaller area to enlarge. It’s just as effective at checking sharpness. 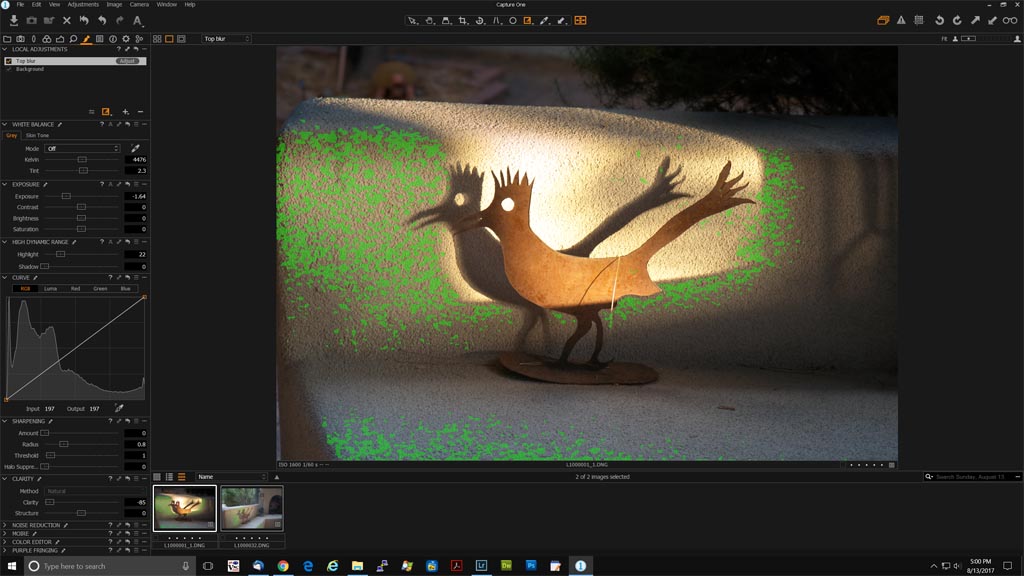 Focus Mask But you don’t have to magnify anything in Capture One for a rough focus check. The Focus Mask tool shades the sharp areas with green in every imported shot in your filmstrip view. You can choose the color, sharpness threshold and opacity on all those masked areas with Edit > Preferences > Focus. I set my threshold to 300 from the default 250, but left the default opacity and color in place. I also right-clicked the top toolbar area to access Customize and add the Focus Mask icon (the 4-paned window) to the capture tool area. I can toggle the Focus Mask on and off just by clicking the icon. The tool found the rough texture in front of and behind the roadrunner subject, so it’s not foolproof. Here the loupe tool showed me there was enough sharpness for a closer look. Basic Tweaks Raw files from cameras and lenses I use – mostly Canon EOS 5D mk II with EF L-series and DO IS lenses, or Leica M10 / Fuji X-E2 with Leica and Zeiss M-mount lenses – give me files I usually tweak for clarity / contrast, shadow and highlight areas, and vibrance / saturation. Occasionally there are white balance issues with the X-E2 camera’s auto white balance, and I tweak WB to a warmer tone. I’ll then apply Lightroom’s Graduated filter to hold back the sky, or darken the background. Those are my basic Lightroom adjustments. And they all have equivalents in C1. I found most of them when I set up my C1 workspace, with the same names and function as Lightroom. The only exception is grad filters, which work a little differently in C1. 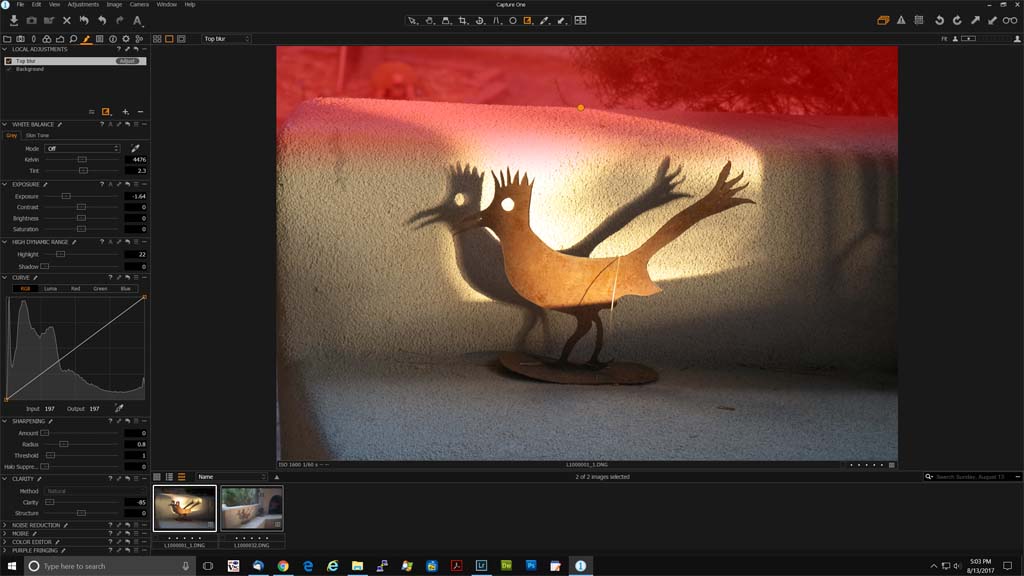 Gradient Mask in Capture One Hold That Sky! Capture One does have a gradient (grad) tool to hold back overly-bright skies, something I use all the time in Lightroom. Access it from Window > Create Floating Tool > Local Adjustments. In the tool that appears, click the + sign to create a new adjustment layer. Right-click the tool’s brush icon, and select Gradient Mask. When you slide your cursor over the image, it turns into a crosshair. Left-click and hold on the point you want the gradient to start at, then move down to where you want it to stop. Then release the click. To adjust settings in your new gradient you’ll need to click the (different) brush icon to your screen’s upper left, in the middle of the row. This brings up the actual local adjustment sliders for your gradient. You get all the options you’re used to in Lightroom except the extreme contrast adjustment from de-haze. You also get curve control, something Lightroom doesn’t give you for a gradient. That allows you very fine control over the tone in the gradient area (and above its starting point). 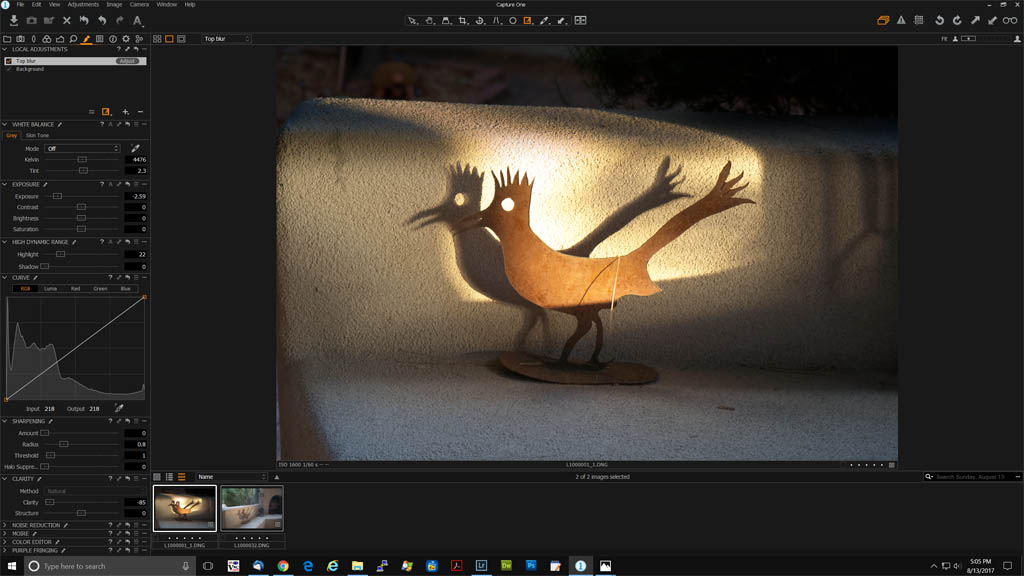 Gradient Mask underexposure In the example image with the roadrunner sculpture, you can see my gradient mask underexposure / darkening of the upper area and de-focusing it with clarity. I’ve overdone it to show the difference. Sync Settings – A Few or All Of ‘Em To apply adjustments from one master image to several others like Lightroom’s Sync Settings, you first need to select the master image. Then select the images to be adjusted by holding down the CTRL key and clicking. This leaves a bold white rectangle around the master image, and thinner white rectangles around the selected images. Then click the angled double-arrow icon for the adjustment(s) you want to synchronize. Click Copy, then click Apply. I did this with the Local Adjustments tool window for the gradient I just applied to get the same grad on other images. I can also pick individual tools/adjustments to apply the same way. Finally, I can copy ALL the adjustments using the upward arrow in the upper right corner, then apply them to the images to adjust with the downward arrow in the same place. It takes some extra steps compared to Lightroom, but there’s similar flexibility. Crop It! Cropping starts with the crop tool. You load it in the usual way from Window > Create Floating Tool > Crop. You can choose Unconstrained for a free-form crop, Original for the file’s camera-generated ratio, or a variety of other preset ratios. Then use the crosshair cursor to select the crop of your image. Move the cursor to the corners of the crop to show the curved rotate tool if you want to level out the image. Then click the downward left icon at upper center to apply your crop. If you don’t do this, you won’t see the cropping. This is very unlike Lightroom’s simple click or hit return to apply. I searched online help (no help) and looked all over the screen to figure this one out. Lens Profiles Click the lens icon at upper right, and you can choose lens profiles to match the one that drew your image. This works great if you’re using Canon EOS, recent Nikon F-mount lenses, Sony or Olympus, but you have just one lens profile for Leica (I don’t use the previous-generation 50mm f/2 Summicron-M), and a limited set for Zeiss and Voigtlander. However, the generic lens profile has adjustments for distortion, fringing (chromatic aberration), and keystone (vertical and horizontal tilt correction). Certain lenses are known distortion pigs. One of these is Canon’s EF 16-35mm f/2.8L (first version) with its wavy mustache distortion of straight lines. That’s one I routinely correct in ruins and real estate pictures. Other lenses, like Leica’s 75mm f/2 APO-Summicron-M ASPH, don’t show any distortion or noticeable vignetting. In general, you’re best off avoiding lens profiles and chromatic aberration (fringing) correction in Lightroom and Capture One when you can. They can degrade image quality, or reduce picture area. If your camera corrects for specific lens distortions (Leica M10 and M typ 240 for two), check the corrected effect. If it’s to your liking, definitely uncheck the lens correction in Lightroom and Capture One. You may want to disable both the camera’s correction and the ones in Lightroom or Capture One for best picture resolution.  The tweaked roadrunner – end result from Capture One with toned-down highlights The Bottom Line In a nutshell, Capture One offers you more precise control than Lightroom, with image library management. It also gives you fast evalution of sharp shots, saving you time up front. You access its tools a bit differently, but C1 offers more precise adjustment options for many of them than Lightroom. If you’re ready to switch, Capture One can import your Lightroom catalogs. You don’t get a few things like collections, crops, rotations and some of the edits, but the basic stuff is all there. As familiar with Lightroom as I am, I’m not ready to switch whole-hog just yet. But I’ll likely do a few imports in C1, especially if I want to quickly evaluate sharpness for a few hundred images. |
(408) 483-3782
Curious about how to shoot ruins?(408) 483-3782
Recent Comments