Beginnings
A book of gorgeous photographs. Your new son’s gurgling smile. Your trip to Alaska.
Something gives you a burning interest in photography. You have to find out more about it. That gets you started.
I Click or scroll below the fold for fast tips on using your camera better.
Use A Manual Camera – Or A Camera Manually
With that interest, the best camera is always the one you have with you. At the same time, it helps if you have some manual control over it. You’ll learn faster if you try photographing with different exposure settings. An auto-everything camera won’t teach you about light.
Most of todays’s cameras give you a manual option – get one that allows adjustment of shutter speeds and lens openings (lens aperture AKA f-stops).
Used cameras are a great option if you want to save money. Buy one of the major brands (Canon, Nikon, Pentax, Sony) from a reputable camera dealer. It can be one with a single lens you can’t detach. It can be a low-end compact dSLR with a kit lens. That’s fine for now.

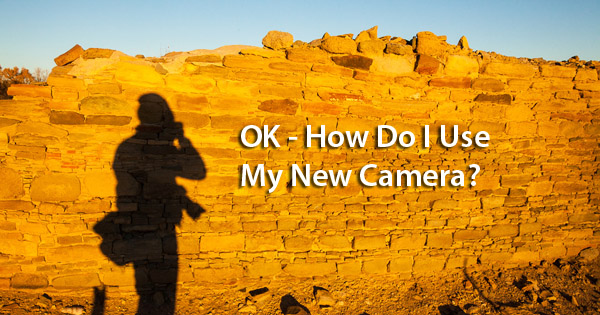
Shadow cameraman at Salmon Ruin, Farmington, New Mexico
It’s best to find a camera with a real viewfinder. That puts the camera against your face, giving you a third point of stability to go with your two hands. You have a better chance at sharper pictures right away.

Completely manual (film) camera – Leica M3 with 50mm f/1.5 Summarit
Stop Right There – Which Lens?
The thing that puts your picture to pixels is the lens. That makes it more important than the camera. Before digital and good zooms, camera stores sold you a 50mm lens with your first SLR. On a full-frame camera, a 50mm lens ‘sees’ the way you scan a scene with your eye. You usually had an f/1.8 maximum aperture on your 50mm, letting you use narrow depth of field to isolate your subject from its background.
Today, you have the option of the so-called kit zoom. This lens gives you views from wideangle to mild telephoto, without moving. But it also gives you a not-so-open maximum f/3.5 or f/4.5 aperture, which doesn’t isolate your subject well at most distances. It also may encourage you to not move – to be lazy.
Move To Change What’s Close and What’s Not –
Even With A Zoom
You change the placement of objects and people in your pictures by moving closer to them – or farther away. The picture will look different from what you get by staying put and zooming. Neither approach is necessarily better or worse – just different. It may be worth it to shoot it both ways, something I’ll get into in a later post.
That first lens choice is up to you. You may want the flexible field of view the zoom offers, but you’ll probably want the narrow depth of field from a ‘fast’ 50mm or 35mm prime lens sooner or later.
White Balance
Your eye and brain make adjustments for the cool blue light of mid-day and the warm, orange light near sunset, so that most of the color you see looks pretty uniform. Your digital camera can only do that with its auto white balance function. That’s your best starting point with most pictures. Almost any digital camera from a major maker like Canon, Fuji, Nikon, Pentax or Sony will give you good color from auto white balance.

Mountains and storm – US 550 near San Ysidro, New Mexico.
Cloudy white balance worked best here.
Enlarge ‘Em
You learn fastest by seeing your pictures at a large size. Don’t edit in the camera – upload the day’s photographs into an editing program like GIMP, Picasa or Lightroom. GIMP is free and Picasa nearly so, but Lightroom has more editing flexibility and is easy to use. Either way, seeing your pictures on a big screen shows you what you did wrong or right with exposure and light on your subject.
Get It Right In The Camera
The editing program can make some changes to contrast, exposure, color and cropping, but it’s always better to get it close to right in the camera. The less editing you need later, the more time you have to shoot more pictures. There are also some things you can’t redo later. If you should have been closer and your subject is a tiny dot in the corner, no amount of cropping will give you more subject detail.

Restored Great Kiva and diffraction sunstar
Aztec Ruins National Monument, New Mexico.
I used a small f/11 aperture here to help the sun diffract and show rays,
Guidance from a Pro – Aperture, Shutter Speed and ISO
When I was getting serious about it, Ansel Adams’ The Camera taught me relationships between shutter speed and aperture. Fast shutter speeds freeze the action, but you need a wide-open aperture for correct exposure at the fast speed. With that wide aperture, you need really accurate focus or your intended subject gets fuzzy. Even the latest auto-focus cameras require you to pick your focus point – usually the near eye of your subject, animal or human, or the thing that really excites you in a scene.
Yes, you can choose a higher ISO – ‘film’ sensitivity – to give you both fast shutter speed and let you stop down your aperture a bit – but a very high ISO will give you a noisy, grainy-looking image. Like most things, it’s a tradeoff.

Golden eagle (captive) –
Northwest Trek Wild Animal Park, Eatonville, Washington.
Focus on near eye.
Depth of Field
Besides, you may want that wide-open aperture for the narrow depth of field – depth of focus – it gives your pictures. You can choose what part of your subject is sharp, and put everything else out of focus with a wide aperture AKA a low f-number. That’s how the cinematographer isolates the hero in scenes from your favorite movie.
Go Out And Photograph
This is where your passion comes in again – shoot what you love. Wildlife, weddings, people, pets, street scenes, landscapes, travel, news, sports – it’s all out there, happening every day. Go out and have some fun. In time, you’ll learn to translate what you see into an “oh, wow” picture, one that tells a story.
It’s that story that makes a picture worth looking at.
Find a Native Guide
Finding someone with more photography knowledge will get you there faster. Many local community colleges offer photography classes, but I always learned best from on-location workshops instructed by knowledgeable pros.
Take a photo tour to unknown World Heritage Sites and undiscovered scenic areas in the U.S. I can help you capture them professionally on pixels.
Learn more at www.activelightphotography.com.
|


Recent Comments